Personal setups » Andy’s singlespeed setup
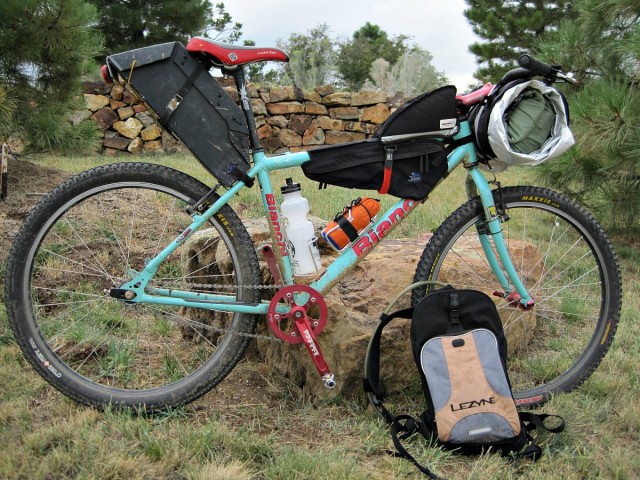
My current singlespeed setup involved a bit of a rags to riches story when it comes to my bags. The riches being the handlebar bag and the rags being the homemade coroplast seat bag.
My philosophy in packing my gear is to keep like items together. There may be better ways to distribute the weight, but I like knowing that all of my sleeping gear is in one place. I’m also a fan of MYOG as you will read. It’s fun to come up with a new crazy idea to see if it will work.
I have tried to include as many product links as possible so you don’t have to search around for the products. Hopefully that helps.
Starting with the riches.
Handlebar bag:
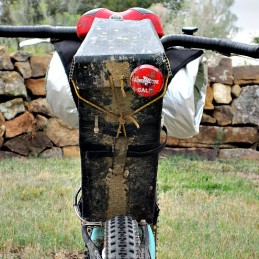
My handlebar setup contains my entire sleep system and personal care items. I use a Revelate Designs Sling and Small Pocket with an OR Dry Bag.
The dry bag contains my sleep system:
- Homemade Ray Way quilt
- Goose Feet down booties
- Mont Bell UL short sleeve down jacket
- Homemade Ray Way insulated hat
- Kooka Bay pillow
- ZPacks Hexamid Solo tarp
Wrapped around the dry bag is an Adventure Medical Kits SOL Thermal Bivy with a Kooka Bay sleeping mat inside the bivy. The bivy acts as a ground cloth and doubles as, get this, a bivy sack with my quilt inside if it’s extra cold or rainy. This is an idea that I just came up with and I haven’t had a chance to test it.
Inside the handlebar pocket is my Pale Spruce StayOutThere kit* (first aid, sun care, hygiene products, emergency gear, and knife). The pocket also has room for other gear such as maps or cue sheets.
*Disclaimer – Pale Spruce is my company and I design/sell the kits.
Frame Bags:
The gas tank bag is an Eleven 81 Top Triangle bag that I flipped around for a gas tank. It carries odds and ends such as phone, spare batteries for lights, spare tube, and extra food if needed.
The frame bag is a Jandd Frame bag and its sole purpose is to store food.
Downtube water bottle holder
This is another new idea. I have my Campmor rain pants in a sil-nylon stuff sack and then it is strapped into the cage. I don’t need/use the rain pants very often so they get tucked away here. Eventually, I would like to have a larger frame bag to hold items like this, but I’m making do with what I have right now.
Seatpost Bag
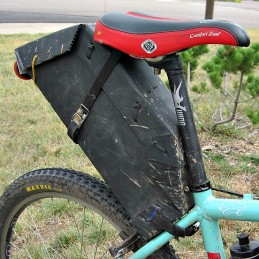
Homemade coroplast seatbag. The idea came from reading about Kent Peterson and all of the coroplast items he has made. The “bag” is painted matte black to make it look a bit more respectable 🙂 I have had this “bag” for several years and it is still holding up quite well.
You can’t see it in the photos, but the bag sits on a bracket made for slip on fenders. I designed the bag around the bracket so that it would have a sturdy attachment point.
Contents:
Spare clothing (shorts, socks, base layer)
Arm warmers
Walz caps wool cap with ear flaps
Toe covers
Long fingered gloves
Eyeglasses
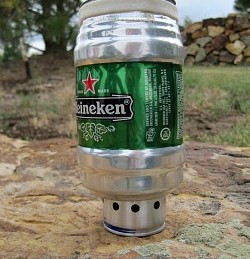
Heiney pot for my morning coffee. The pot is packed with my homemade alcohol stove, coffee, lighter, and alcohol.
Carbon pole for tarp
Emergency space blanket
Small notebook and pen
Hydration pack
100 oz. water bladder
Bike repair items (multi tool, patch kit, spare nuts and bolts, spare chain link, second spare tube, small pump)
Plenty of room for more clothing or other items
I think that covers it all. Hopefully this is not too long and detailed.
Andy


Awesome. A quilt. Nothing new under the sun eh. Heaps of cool stuff in here to geek over. Thanks Andy.
After reading this I checked out Kent’s stuff on the coroplast. I’ve got tons of that stuff. I cut the white ones up and stencil a big black arrow on them for course markers. My shooting club uses them for walls. Our local judges must go through a few 18 wheelers of that stuff every election cycle.
After some additional research, I found this link in regards to gluing or bonding it together.
http://www.recumbents.com/mars/pages/proj/misc/coroglue.html
Some guys are also doing reinforced rivets then sealing the rivets with tape. That material provides a bunch of options….especially if you have good origami skills! Thanks for the post.
That’s so cool. I made a frame “bag” out of it last year, but never got the chance to test it. I’ll have a go at the seat bag now – thanks for the inspiration! Also props for the SS Bping – I’ve only got an SS or my Cross-Check these days.
WIth that setup, what is (roughly) the minimum temp at which you can sleep comfortably? Spoilt here, in summer it rarely get below 15 deg C, or what’s that? About 60 F. Don’t need much warm stuff!
Dave, I never thought about the rivets but that would probably work very well. I don’t know if I would go the glue route because some of the bends are tight and I’m not sure glue would hold. I don’t have the origame skills, but I did play make a lot of templates out of poster board before I got it right.
Kurisu, is there any other way that SS BPing :). I have tested the sleep system down to about 40F and I didn’t even have the down vest/jacket on. I would be ok down to about freezing. If you wrap the extra hood like material on the quilt over your head, it makes a huge difference.
If people want to see the poster board template of the seat bag, let me know and I could get some pictures of it to show how it was folded.
That seatbag is great! Definitely thinking outside the box.
I’ve worked with corroplast for building bike travel boxes and have used what I guess you would call a plastic box rivet. They held up to the airline baggage handlers, so pretty strong, anyway another good option for building/bonding with corroplast. I purchased them here: http://www.mrmcgroovys.com/
The plastic box rivets look like a great idea. I’m thinking about building a frame “bag” for another bike and I’ll have to try them out. If they made it through airline baggage, I’m sure they would hold.
What wheel tensioners do have there?
Bart, sorry but I’m not sure what type they are. They came stock with the bike when I got it a number of years ago.
Andy,
I would love to see a template of that seat bag you manufactured! How does it hold up to heavy use?
Thanks!
Brandon, the seat bag has held up for almost 4 years now and I haven’t had any problems with it. I’ve recently upgraded to a real seat bag, but the coroplast is an option.
Here is a post I wrote about making the seat bags and using a poster board template. http://www.palespruce.com/myog-coroplast-seat-bag/
It feels like a grade school art project when you start, but if you get the wedge shape done first, you can refine the folds and angles to close up the “bag”. I use one pice for the bottom and sides. A second piece of coroplast is used for the top and opening. Hope that helps.