Personal setups, Ultralight / Singletrack » A Rawland Drakkar for Ultralight Bikepacking

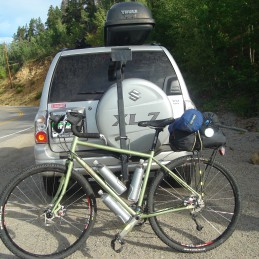
I recently built this Rawland Drakkar as an all-rounder for ultralight bikepacking. It works great for a variety of terrain, especially single track, gravel roads, but also pavement. Recently rode it to Taos on a mixed terrain route including parts of the Great Divide Route.
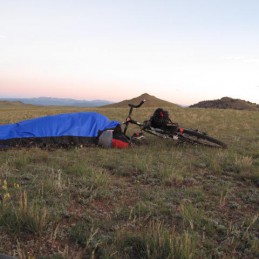
Camping Setup
Lashed to rear rack in stuff sacks only
- 1.5 lbs, 20 degree bag from Kelty.
- 1.0 lbs, Goretex bivy bag by Outdoor Research
- 2.5 lbs, Sleeping pad from Thermarest (deluxe – I like a little comfort)
- 6.0 lbs, Stuff sack filled with tool kit, ditty kit and dried food (nuts, fruit, beef jerky
Other on the bike
- 6 lbs, water in 3 water cages. Used 1 liter Smart Water bottles to carry more.
- 5 oz, Spot 2 satellite messenger.
On my Back
- 1 lbs, Golight backpack
- 7 lbs, of contents in back including warm layer, shell, extra shorts, extra shirt, extra gloves, 2 bandanas, money, cell phone, hat, gloves and light cable lock. Also carried a few photocopied maps and directions.
My basic camping setup was definitely minimal, but worked well for about 3 nights until I was able to stay in a hotel in San Luis just north of the New Mexico border. I did get tired of eating dried food, but it worked. Going ultra light made the riding more enjoyable and was able to go further each day.

Bike Setup
Drive Train – Shimano XT for both derailleurs. 22-32-44 front chain rings. The rear cassette has an 11- 34 tooth spread. This arrangement maxes out the long cage rear derailleur’s range of 45 teeth. With a 29er wheel size I get a low around 18 gear inches and a high around 112. Shimano bar end shifters sometimes called barcons often used for touring bikes seemed a good choice. Bar end shifters are simple, easy and work well.
Handlebars – Salsa’s Woodchipper was the handlebar for me. The drops flair out, providing added leverage and stability for single track, but the bend flairs less allowing a more standard brake lever placement than other designs. Woodchippers are designed to ride off road in the drop position. For an old rider like me that meant raising the bars further than expected. I used all the steering tube provided. The only downside is the large width. One needs to be careful navigating in close quarters with these bad boys.
Brakes – Avid BB7 mechanical road disc brakes which were easy to install and adjust even for a first timer. I opted for a 160 mm front rotor, while the rear is only 140 mm. This asymmetrical setup saves weight, but the bigger reason is simple physics. A rear wheel provides less stopping power before skidding. For hauling big loads, I might reassess this strategy.
Wheels – With three wheel formats possible (650b, 700c or 29er), this decision was rather difficult. Sure, I could have ordered three different wheel sets and switched between them to create virtually three different bikes. But I’m interested in creating one all-rounder that will take me anywhere without carrying extra wheels. It was important to choose the single most versatile wheel set. I chose a Stan’s No Tubes factory wheel set with Arch rims and ZTR hubs. The Arch rim allows full 29er tire widths or wide 700c touring tires, virtually spanning the entire wide and medium tire width spectrum (but not skinny road racing tires). Arch rims can be used with tubes but are tubeless ready.
Tires – Schwalbe 45c Smart Sams which are marketed as all-terrain tires seemed a good choice. My hope was to find one tire that handles a variety of terrain well. Spinning extra rubber on pavement was not appealing, but neither was washing out on gravel or single track. At 1.75″ the 45mm width was a good compromise. While the 29er width Smart Sams come UST tubeless, the narrower and lighter 45c version did not have a UST stamp. I went tubeless anyway to save rotational weight and to reduce puncture flats in cactus country. Rotational weight is a big deal since a one pound savings at the rim and tires is worth 2 pounds on the frame (or other non rotating parts including rider and gear.
Nice bike. Might I suggest that a front triangle frame bag would be a good idea. It would enable packing the heaviest items low and in the center of the bike, something which actually makes a difference on more technical singletrack.
Outsider/Yeti, you can see with 3 water bottles it’s hard to fit a triangle bag. This bike still works fairly well on moderate trails as packed. Had no troubles on the Great Divide Route. I suppose for difficult single track I’d need to go with 2 water bottles instead. But the 3 water bottles sure comes in handy.
Looks like a great set up, I’m currently lusting for this frame. Curious abut your water bottle set up, do the Smart Water 1 liter bottles fit well with most cages or did you have to use something specific?
Ron, I’ve had good luck with the big one liter smart water bottle in a normal cage. But they are quite long (since they are narrow as a normal water bottle) so they might present an issue for smaller frames with less room between tubes. No problem however on my medium Rawland Drakkar. I love this frame and the current build – this bike is a true all-rounder.
[…] a curious bystander that has one of their bikes. The Alpine Bicycle Club: Rawland Drakkar Review bikepacking.net > > A Rawland Drakkar for Ultralight Bikepacking Reply With Quote + Reply to […]
Hello, great bike. Looking for the same thing. What size frame do you have? I’m 6’2 and not sure what size would fit me best.
Thanks,
Pawel