Personal setups » 29erTurtle’s Set Up
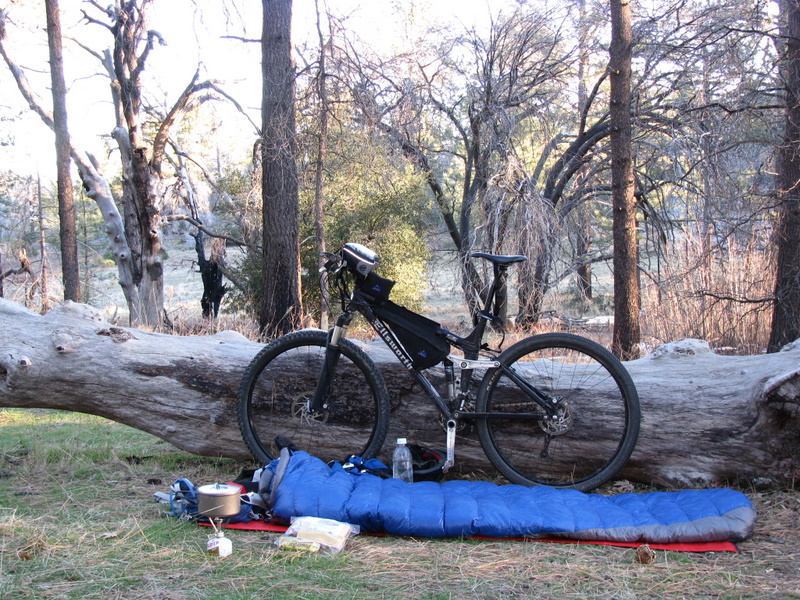
Campsite in Cuyamaca State Park, San Diego, Ca
The picture above is from a recent bikepacking trip to the local mountains. Overnight lows were in the high 20’s and daytime highs were in the mid 60’s. There were Santa Ana winds which were predicted to die down during day 1, but ended up blowing for the entire trip at a constant 20 mph and getting gustier throughout the day. Most of the items used were things I already owned (I have done alot of lightweight backpacking, climbing and mountaineering) but the bike bags and Osprey Pack were new for the purpose of bikepacking. Basically this seems like a set up that would take me through most 3 season conditions.
I learned a lot about what works by reading about other peoples set ups and through my experiences on this first trip. I hope this list will help others, but my true motivation for posting is to get feedback from others on how to further lighten my set up and streamline my packing. My goal is to tour the complete Colorado trail this summer with a light set up that is fun to ride with, but still provides adequate comfort and safety in camp. (i.e. I’m not looking to strip it down to a race kit) Since the time of this first trip I have changed a few things in pursuit of lightening up and welcome your thoughts, ideas, and feedback. I have posted my list following the conventions commonly used over on Backpackinglight.com to see where all the weight comes from and to make it easy to suggest lighter individual items and where to get rid of things all together.
Riding Clothes: Typically a pair of bike shorts and a short sleeved synthetic t-shirt. I currently own a pair of SIDI’s but am looking for something more comfortable to walk in.
Bike: Ellsworth Evolve, full suspension 29er, size large.
|
Bikepacking Gear List |
|||
|
Sleeping and Shelter |
Mtn Hardware Phantom 32* |
26.7 oz |
6’6″ Length |
|
|
Adventure Medical kits Emergency Bivy |
6.8 oz |
Adds an estimated 10* to sleeping bag, provides extra waterproofness under tarp and serves as groundsheet |
|
|
Thermarest “Ultralight” 1″ thick x 3/4 torso length |
16.2 oz |
Older pad, not so ultralight, but more compact than the foam pad I use for backpacking. |
|
|
Sil Nylon Tarp 8.5′ x 5′ |
7 oz |
Includes guylines |
|
|
Stakes |
2.3 oz |
6 ti stakes, 2 Easton Nano stakes |
|
|
SLEEPING AND SHELTER TOTAL |
59 oz 3 lbs 11oz |
|
|
Cooking and Hydration |
1 Liter Bottle |
1.5 oz |
Recycled widemouth Aquafina Bottle |
|
|
2 Liter Platypus water bag with hose |
4 oz |
|
|
|
Lexan Spoon |
.4 oz |
|
|
|
Snowpeak 900 Ti Pot with lid |
5 oz |
|
|
|
Whitebox alcohol Stove |
2 oz |
Includes windscreen. Switched from canister due to lighter weight, wider availability of fuel, and no more partial canisters to keep track of at home. |
|
|
5 fl oz of denatured alcohol |
5 oz |
Includes recycled 8 oz water bottle with squirt top for storage |
|
|
Small lighter |
.4 oz |
|
|
|
COOKING AND HYDRATION TOTAL |
18.3 oz 1 lb 2.3 oz |
|
|
Clothing Carried |
Patagonia Puff Vest |
11.7 oz |
|
|
|
Montbell Wind Shirt |
6.4 oz |
|
|
|
Montbell Wind Pants |
6 oz |
|
|
|
Marmot Precip rain jacket |
12.8 oz |
|
|
|
Pearl Izumi Leg Warmers |
4.8 oz |
|
|
|
Pearl Izumi Arm Warmers |
2.5 oz |
|
|
|
Smartwool adrenaline socks |
1.7 oz |
|
|
|
Mtn Hardware Fleece Hat |
1 oz |
|
|
|
Sil Nylon Dry sack |
1.2 oz |
|
|
|
CLOTHING CARRIED TOTAL |
48.1 oz 3 lbs 1 oz |
|
|
Packing |
Sea To Summit 8 L Dry Sack |
2 oz |
Strapped to seat with sleeping bag and tarp |
|
|
Sea To Summit 4 L Dry Sack |
1.5 oz |
Strapped to bars with Thermarest and bivy |
|
|
Jandd Frame Bag |
6.1 oz |
Flipped end to end, fits large frame after moving two sewn on straps. Carries small heavy items and bike tools. |
|
|
Osprey Talon 22 |
27 oz |
Carries food,cookpot, and clothing |
|
|
Lash straps (4) |
2oz |
|
|
|
PACKING TOTAL |
38.6 oz 2 lbs 6.6 oz |
Since the time of the picture I have removed the handle bar bag and am debating the need for the tank bag. |
|
Other |
Water treatment |
3 oz |
Aqua Mira |
|
|
Toothbrush and paste |
2 oz |
|
|
|
Black Diamond Spot headlamp |
3 oz |
Includes lithium batteries and small homemade Velcro strap for attaching to helmet. Good for dirt roads, marginal on rocky singletrack |
|
|
Sun Block |
2.5 oz |
|
|
|
Glasses, contacts, solution in crush proof case |
5 oz |
|
|
|
Chamois Creme |
2 oz |
|
|
|
1st aid / Emergency Kit |
4 oz |
Cuts, scrapes, wound cleaning, Ibuprofen, fire starter, whistle, waterproof matches |
|
|
Lip Balm |
.5 oz |
|
|
|
Mosquito Headnet with metal loop |
1.5 oz |
|
|
|
Compass |
1.6 oz |
|
|
|
Maps |
2 oz |
Weight varies by trip |
|
|
Cannon Powershot Camera |
11.6 oz |
Heavy but nice features |
|
|
OTHER TOTAL |
38.7 oz 2 lbs 6.7 oz |
|
|
Bike Tools and Parts |
Crank Brothers Mini Pump |
3.4 oz |
|
|
|
29″ x 2″ Tubes (2) |
15.1 oz |
Shockingly heavy! |
|
|
Park CT-5 Chain Tool |
2.6 oz |
Perhaps combine with a small multi tool |
|
|
Park Mini Multi tool |
3.9 oz |
Perhaps replace with one that has a small but functional chain tool |
|
|
Tire lever with 1 yd of duct tape wrapped around it |
1 oz |
|
|
|
Rock Shox Shock Pump |
7 oz |
|
|
|
2 fl oz Stans Sealent |
2 oz |
|
|
|
Parts Kit |
1.3 oz |
Spare bolts, tire boot, tire patches, derailleur hanger, quick link |
|
|
Rag |
.5 oz |
|
|
|
Small Bottle of Chain Lube |
2 oz |
|
|
|
BIKE TOOLS AND PARTS TOTAL |
38.8 oz 2 lbs 6.8 oz |
|
|
|
OVERALL TOTAL |
241.5 oz 15 lbs 1.5 oz |
|
First, that sounds like a nice kit already. Unless you have money to blow, I’d be happy with it and ride. Though, as a gear head myself sometimes, I can understand the quest for better gear.
So with the later in mind, if you want to drop some weight you can do one of the standard weight saving things and drop some dough on a new sleeping bag. I’m really happy with my 18oz Western Mountainering SummerLite. It looks like that will save you about a 1/2 pound.
Another thing, that costs under $2, is to leave the CO2 at home and get a little adapter to thread onto your valve so you can use an air compresser so seat you tubeless. I’ve found that if my sealant isn’t going to seal a hole on it’s own then CO2 doesn’t help anyways. I think the CO2 actually kind of drys up the sealant I use. If I have to reset my bead I just put in a tube then when I get to a gas station with a compressor I thread on the little adapter and pull the tube and reset my bead with the compressor. That should save about 3.5oz.
And how about doubling your rain jacket as a wind shirt saving 6.4oz. I may not do it if I’m worried about being speady but when the air is just a little too cold (long, cool desents especially) I often put on my rain jacket to cut the wind. Slide up the sleaves, open pit vents, unzip as much as needed, hood or not, as temperature demands.
Have fun out there!
Thanks for the thoughts. Definitely not looking to spend a lot to lose only a few ounces. I know the sleeping bag could be lighter, but I cant see spending the money even for the half pound savings knowing that the current bag is still very functional. But you have me pretty well pegged as a gear head and I can be a bit obsessive on the quest for better/lighter gear. The sleeping pad for instance is “extremely” heavy given the current offerings available but it is the first Thermarest I have had last this long without developing numerous pinhole leaks.
The rest of your suggestions are exactly what I am looking for; ways to drop items that could easily be done without, because they are simply unneeded or whose purpose could be accomplished using other more versatile items I am already carrying. In rereading this list I agree the CO2 is not really needed. I am already carrying a lot of other items to handle flats. (2 spare tubes, patches and a pump) The CO2 is gone.
The wind shirt falls into the same category and could be comfortably eliminated using the rain jacket for windy conditions but I am having a harder time convincing myself to leave it at home. It is much more comfortable than the rain jacket and can be worn on breezy rides, long descents, light drizzle, buggy camps or as an extra insulation layer without getting as clammy as the rain jacket. I started carrying it as a light extra layer but I have found I wear it a lot in many conditions. I overheat easily while riding and the windshirt is so much more breathable than my rain jacket. I’m considering leaving it, but its not gone yet.
Thanks for the feedback and keep the ideas coming.
I would agree that for most of the time I would rather have the extra weight (100g or so)of the windshirt because you can not replace it with a rain jacket, unless you have a very breathable jacket, perhaps like an Event jacket with pit-zips and pocket vents. Otherwise there are times when I need more wind protection and a rain jacket is almost always to clammy. The other exception would maybe be in very cold weather using one of the Nikwax Pump lined jackets as a combination wind, water, and insulation layer(see C. Townsends article on BPL) If I don’t expect much rain and cold I will take the O2 jacket, it is even lighter and very breathable(and cheap enough to by as a second jacket)
It looks like your set-up is pretty bombproof.
Shaun mentioned Western Mountaineering, they are a stand up company that builds solid gear. If you purchase from them it will be lightweight and you’ll own it forever.
I would also recommend keeping the wind shirt, hang on to the flexibility/protection it offers without the moisture build up of the rain jacket.
Cheers, looking at this as a holiday option, so nice tips well written
Great format for you gear list turtle, I wish everyone here would be so organized 🙂 Trip report?? How did it work?
Thanks for the comments on the formating. As far as a trip report there is one in the trips reports section of this site about a shake down trip in the local mountains around here in preparation for a CT trip. I did a couple other local trips in preparation this past summer, but then I tore up my knee playing soccer in June about 2 weeks prior to departing for the trail, had surgery in august and just got back on the bike this past September.
Looking to start a bike packing kit.
I have a Seedhouse SL 1 that I can light pack w/ just the fly and poles.
REi 3/4 length lite core 1.5″ pad
use either a 30 d. Sierra Deisgns 600 fill down bag or 2 silk travel sheets in the summer.
I need some suggestions for frame bags.
Also I am a big guy around 6’4″ and over 250. I can’t use any Osprey packs. I have a Gregory z55 that I love. However it is way to big to ride with. I have thought about trying a z35 , but it is still over 2,100 cu. in. So I fear it may feel big on the bike. Any big guys out there have suggestions? Or ideas? I am thinking for now of using my bigger Camelbak Alpine Explorer bag, strap under the seat w/ dry bag and a frame bag.
Great idea from your list Turtle 29. Thanks-
The sea to summit brand dry bags in smaller sizes seem to work especially well for strapping under the seat because they have an oval shaped profile which allows them to strap under the seat without rubbing my legs when pedaling. I think a larger or round bag would rub and get irritating quickly.
I too am a larger rider (6’3″, 220 lbs.) but have found that the size large osprey works fine for me.
;”~ I am really thankful to this topic because it really gives up to date information -,’