Pages: [1]
Reply Reply New Topic New Poll
  Topic Name: weight distibution on: June 16, 2010, 04:49:19 PM
trojobikeho


Posts: 3


View Profile
« on: June 16, 2010, 04:49:19 PM »

Browsing the personal set ups I notice that most people seem to keep the weight up high, on the seat post, handle bar and top tube area. Having done some road touring and commuting, I have learned to appreciate how the bike handles when the weight is carried lower, especially on the front rack where the load is not much higher than the axle. This really feels better especially when I'm out of the saddle and rocking the bike back and forth. I've seen water bottle cages on a front fork on one of the tour divide racers, but not much else. Does anyone have any examples of good ways to carry some weight lower on the bike? Or perhaps experience with negative aspects of this type of loading (front end too heavy, etc). Thanks in advance!
Logged

  Topic Name: weight distibution Reply #1 on: June 16, 2010, 10:00:59 PM
sfuller


Location: Central Iowa
Posts: 324


View Profile WWW
« Reply #1 on: June 16, 2010, 10:00:59 PM »

I've spent some time in the road touring world, and am now starting to switch over to more off road stuff. One reason for keeping things high is that I don't want a lot of stuff sticking out from the sides of my bike where it can catch on trees/rocks/etc. From what I have seen, most of the bikepackers tend to carry, bulky but light stuff (sleeping bags, etc) up front.
Logged


  Topic Name: weight distibution Reply #2 on: June 17, 2010, 02:08:43 AM
Singlespeedpunk


Location: Gloucestershire, UK
Posts: 80


View Profile
« Reply #2 on: June 17, 2010, 02:08:43 AM »

It depends what you put in there. I pack my seat bag with light(ish) stuff like clothes and sleeping mat (max 2kg?) and probably the same on the bars (Epic Designs handlebar harness and Alpkit dry bag with sleeping bag / bivvie / tarp in it)

All the heavy stuff like tools, water and food goes in my Camelbak or (when I order it) the Epic Designs frame bag to keep it lower.

As the total kit weight is nver over 20lbs (excluding water and food) it is a lot less than many traditional pannier and rack set ups (which can weigh several Kgs on their own!)

SSP
Logged

"...and yeah this fixie thing is pretty bomber" mc

www.fixedisfucked.blogspot.com

  Topic Name: weight distibution Reply #3 on: June 17, 2010, 07:04:50 AM
jeffkerkove

Topeak | Ergon | Canyon


Location: Eagle, CO
Posts: 73


View Profile WWW
« Reply #3 on: June 17, 2010, 07:04:50 AM »


Agree with what has been said so far.  From my time off-road with my bike fully loaded, I arrange items on the bike with the heavier items lower on the bike....and get lighter as I go up.  Most 'heavy' items sit in the lower part of my frame bag.  The seat bag....while looking heavy, only contains a sleeping bag, gore-tex sleeping bag cover, and an emergency bivy cut in 1/2 to use as a ground cloth.  All these items weight roughly +/- 1 lb 10 oz.  Total loaded weight of the bike seen in the image is 31 lbs.  Personally, I am all about keeping the profile low and narrow.  Depending on where you are riding, sticks, rocks, and narrow trails could cause a problem.
Logged


  Topic Name: weight distibution Reply #4 on: June 17, 2010, 07:48:52 AM
DaveH
Moderator


Posts: 975


View Profile
« Reply #4 on: June 17, 2010, 07:48:52 AM »

Depending on the shape of your downtube, you may be able to use a Jandd frame bag where your "crud catcher" water bottle goes (underside of downtube).  I stuffed one with a 100oz bladder for CTR last year and it worked quite well.

http://www.jandd.com/detail.asp?PRODUCT_ID=FFP

You could put most anything in it that would fit and is not fragile.
Logged

  Topic Name: weight distibution Reply #5 on: June 17, 2010, 10:32:30 AM
trojobikeho


Posts: 3


View Profile
« Reply #5 on: June 17, 2010, 10:32:30 AM »

It looks like the frame bag with heavy stuff down low is the solution most people have landed on. I'll peruse the forum for frame bag discussions and go from there. Thanks for the input.
Logged

  Topic Name: weight distibution Reply #6 on: June 30, 2010, 10:32:08 PM
stevage


Location: Melbourne, Australia
Posts: 174


View Profile
« Reply #6 on: June 30, 2010, 10:32:08 PM »

My big discovery was that framebag + saddle pack = unbalanced and very hard to control on soft surfaces. Framebag + saddlepack + handlebar bag = balanced.Also, bar bag below the level of the bars is better than above it.

Low is good.
Centered fore-aft is good.
Front is better than back.
Narrow is better than wide.
Not hitting trees is good.
Flexible is better than rigid.
Firm is better than saggy or dangling.
Logged

  Topic Name: weight distibution Reply #7 on: July 01, 2010, 12:20:46 PM
Done


Posts: 1434


View Profile
« Reply #7 on: July 01, 2010, 12:20:46 PM »

Low is good.
Centered fore-aft is good.
Front is better than back.
Narrow is better than wide.
Not hitting trees is good.
Flexible is better than rigid.
Firm is better than saggy or dangling.
I'll try not to read too much into this...  icon_biggrin
Logged

"Done"

  Topic Name: weight distibution Reply #8 on: November 11, 2010, 03:16:30 PM
vaporjourney


Posts: 18


View Profile
« Reply #8 on: November 11, 2010, 03:16:30 PM »

daveH:  did you have to modify your Jandd bag to make it a crud catcher?  It seems to me that you'd only be using the velcro that runs across the bag in a lengtwise direction, but nothing to support the short sides.  Have a pic by chance?

I like the idea of using one as a crudcatcher, as well as having a full frame bag as well.  I'll be leaving for a year long bike tour on nasty/remote roads thru south america this fall and am looking for ways to put more heavy stuff (food/water) on the frame...
Logged

  Topic Name: weight distibution Reply #9 on: November 14, 2010, 10:25:33 AM
DaveH
Moderator


Posts: 975


View Profile
« Reply #9 on: November 14, 2010, 10:25:33 AM »

daveH:  did you have to modify your Jandd bag to make it a crud catcher?  It seems to me that you'd only be using the velcro that runs across the bag in a lengtwise direction, but nothing to support the short sides.  Have a pic by chance?

I like the idea of using one as a crudcatcher, as well as having a full frame bag as well.  I'll be leaving for a year long bike tour on nasty/remote roads thru south america this fall and am looking for ways to put more heavy stuff (food/water) on the frame...

Sorry, no close up pics.  I did some mods - removed the center panel for one.  The bag has a center divider and with that there was no way to get a full bladder in there.  I also cut a hole to let the tube out of an end.  It didn't actually move a lot side to side, and I used a small bungee arrangement to keep it in place and tight as the water level fluctuated.

It is not without some issues.  The zippers are highly susceptible to grime and get almost unusable after some mud riding.  If I was going to head south of the border (or equator especially!) I would not hesitate to contact Eric at Revelate to see what he could cook up.  He can make something much more durable and functional than my hacked Jandd.
Logged

  Topic Name: weight distibution Reply #10 on: November 14, 2010, 01:01:58 PM
vaporjourney


Posts: 18


View Profile
« Reply #10 on: November 14, 2010, 01:01:58 PM »

Thanks for the info about the mud ruining zippers...not sure how I overlooked that.  I'd like to make one myself...perhaps with a velcro closure for durability?  I'm not sure that even the beefiest zipper on the market could handle the abuse that having a piece of gear on the down tube takes.  Perhaps a beefy waterproof zipper??? 
Logged

  Topic Name: weight distibution Reply #11 on: November 14, 2010, 01:44:38 PM
DaveH
Moderator


Posts: 975


View Profile
« Reply #11 on: November 14, 2010, 01:44:38 PM »

That's what I was thinking, although velcro might just be the best thing.  If I was going to make one specifically for water only I'd use a flexible material to keep it "hugged" as volume changed.
Logged

  Topic Name: weight distibution Reply #12 on: November 14, 2010, 04:20:24 PM
vaporjourney


Posts: 18


View Profile
« Reply #12 on: November 14, 2010, 04:20:24 PM »

It's possible to find 1L bottles that fit into a bottle cage.  I wonder if you can rig two of those on the underside?  That's still only 64 vs 100 oz, but at least the only thing to fail would be inevitable bottle cages breaking over time, which can be replaced in any developing country...
Logged

  Topic Name: weight distibution Reply #13 on: December 02, 2010, 12:27:57 PM
mmeiser

Less Stuff. More Freedom!


Location: SE Micigan
Posts: 207


View Profile WWW
« Reply #13 on: December 02, 2010, 12:27:57 PM »

Love the Jannd top tube bag as crud catcher idea. I love my jandd top tube bag. Will have to try it, but i worry there will be no side to side support and that it won't be big enough to pack with my heaviest gear.  Might make a good spot for first aid kit, two spare tubes and tool kit.  Those I usually keep in the bottom of my main triangle frame bag.

However... there's a new game in town for down tube use!


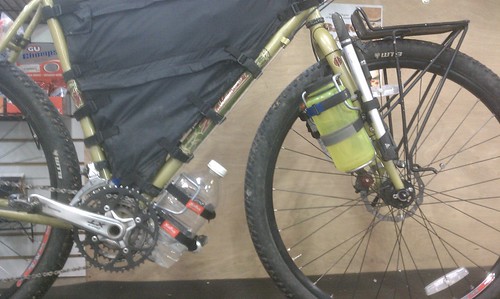
Salsa anything cages have arrived! by mmeiser2, on Flickr

The thing could probably hold a whole gallon of water if you could find a nice round gallon container as opposed to square.  That said I think a 1-liter bottle is perfect.

Unbelieveable storage. (And the fargo unbelieveable ground clearance and bbracket / crank clearance.)

What's funny is this cage has virtually no chance of smacked on a log, the plastic container on there is a Cranberry juice container (only thing I had with me that day) so it's hanging down several inches lower then a 2-liter might.

This is typically where I'd store excess water in three seasons of the year. Most of the time it'd be empty except when crossing remote regions or in the evening when I'd fill it up toward the end of the day to dry camp.

However... in the winter it's a whole new ballgame.  Anything placed that exposed would freeze really darn quick.

== winter water tricks ==

Most people will simply use water bladders on their back under the outer windbreaker if extremely cold.

Personally i hate stuff on my back though I will use a pack for a couple of liters of extra water in remote areas or in the evenings for dry camping.

The only other alternative for winter touring is Nalgenes.  Nothing else I've found works save a stainless steal vacuum thermos and that's to heavy and carries to little for agressive biking.  Indeed stainless steel kanteens can boil water... but are useless for storing water in the winter.  Standard biking wb's just suck for winter. Useless. Even polartec are of no match to freezing temps.

I love lightweight plastic, i.e. the two liter pop bottle or 1 liter smart water bottles in summer. Extremely light, good volume, easily replaced. However in the winter if these freeze there's no way to unfreeze them save sitting inside someplace civilized for hours. They just melt when put in contact with flame or boiling water.  Mine as well throw them out if they get frozen. Less then useless, dead weight. Better to be carrying no water at all then frozen water.

On the other hand a nalgene can have boiling water poored in them and can be unfrozen fairly quickly even if frozen solid... oh, and they don't split or crack when frozen solid.

== insulating a nalgene ==

If one were pannier touring one would just stick their nalgene in one of their panniers surrounded by sleeping bag. Superb protection.

However... noone on this group by nature uses panniers.  Indeed the bivy roll is the only place one might use the sleeping bag trick and then the wb is to inaccessible.

The best improvised trick is a sock or two (preferably heavy wool) and a plasitc bag or dry bag.  Since most people carry a spare pair of smartwook this makes a superb trick. Ultralight.  Efficiency is good enough for most instances as long as it's not below 20 and you're not carrying the water for to many hours.

Oh... some may use production made nalgene cozy's... awesome, but why when they're so easy to make and make better.

Personally though the ultimate trick is to roll up your insulating sleeping mat into a sleave.

I used this technique with a 48oz water bottle a Big Agnes Aircore and dropped it in a dry bag and mounted it on my front fork with a Salsa Anytghing / Everything cage.
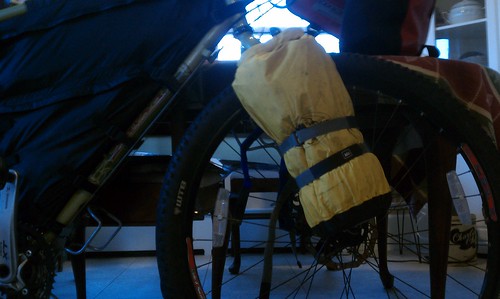

Water by mmeiser2, on Flickr

Of course you need a sock or other lofting article in the bottom or top to keep the ends insulated.

Under my tests the Wool sock trick lasted some seven hours keeping room temp water from freezing in my freezer.  However the Nalgene in insulated sleeping pad trick lasted 27 hours!   Wow. With wind rushing around it on the trail and road this should be more then enough to go through a whole day without worrying about freezing.

BTW... the nalagene remains uber accessible rolled in the sleeping mat. Easily slid out and slid back into the roll.

Oh, and of course always use hot water.  What happens is your airmat will be freezing cold, whatever the ambient temp is. The warm water will immediately be cooled a bit but in so doing raise the warmth of the insulation.  It's the same as doing a little jig in your old sleeping bag to warm it when you first get in. Only your water can't jig to produce heat. Wink

Man... I seem to have gotten somewhat off point, but then water is the heaviest thing most people carry.
Logged


  Topic Name: weight distibution Reply #14 on: December 02, 2010, 12:41:45 PM
vaporjourney


Posts: 18


View Profile
« Reply #14 on: December 02, 2010, 12:41:45 PM »

whoa...those new Salsa cages look amazing.  thanks for the heads up.  Do you think they would mount securely on a non-Fargo fork/downtube using only 3 hose clamps, just like you would a normal cage??? 
Logged

  Topic Name: weight distibution Reply #15 on: December 02, 2010, 07:48:14 PM
mmeiser

Less Stuff. More Freedom!


Location: SE Micigan
Posts: 207


View Profile WWW
« Reply #15 on: December 02, 2010, 07:48:14 PM »

I can say that they mount very well with hose clamps and some rubber gromets to protect the frame.  That said there may be a torsion issue. The cage will naturally want to twist forward and backward around the fork... but maybe not

The above pic is mounted using the mid fork eyelet and two hose clamps. The cage does have three mount points. A major bonus. As mounted it's very secure.  Still... it's carrying 48 ounces of water, sticks out a bot much with the big agnes air core mat wrapped around the bottle for insulation and is going to see some rough stuff so I worry a little.  Mostly I worry a bit about it being to low or taking a hit from a branch or barrier or something as I'm riding.  With a regular nalgene in the summer... or a smaller, lighter load like say an airmat or sleeping bag I don't think there'd be any issues whatsoever.

The reason I mounted it so low btw is because with the 48oz bottle and the insulation it didn't clear the down tube in the placement it was made for.

I also experimented with mounting my winter bag and bivy on it.


Bedroll by mmeiser2, on Flickr

I think that crosses the line. It's practically a pannier and sticks out a little to far for my tastes.

Anyway, I would think if you could figure out a way to keep the rack from torsioning around the fork using only hose clamps and weren't putting to much on it it'd be fine.  Especially if you had an oval fork or something a little flatter on the outside of the fork blade.  As for mid fork mounts I've seen people mount much bigger and heavier loads that stuck out more (traditional panniers with low rider racks) on mid fork mount bolts. Then again those are roadies.
Logged


  Topic Name: weight distibution Reply #16 on: December 02, 2010, 08:40:00 PM
vaporjourney


Posts: 18


View Profile
« Reply #16 on: December 02, 2010, 08:40:00 PM »

with those huge stuff sack setups on the fork, it doesn't even look like you're using the cage at all.  Surely those loads are too wide, and I can't quite see any of the aluminum, but perhaps the angle is wrong and they do indeed provide support.  If anything, it just seems like there would be a "bottom" to prevent the gear from sliding downward on the fork

It's a real bummer they didn't make these out of stainless steel so that they could be welded when doing tours in remote third-world countries.  I've had more bottle cages break than I'd like to count.  But perhaps the 3rd mounting point somehow magically makes a difference on the rest of the cage?
« Last Edit: December 02, 2010, 08:48:02 PM by vaporjourney » Logged

  Topic Name: weight distibution Reply #17 on: December 02, 2010, 09:58:19 PM
mmeiser

Less Stuff. More Freedom!


Location: SE Micigan
Posts: 207


View Profile WWW
« Reply #17 on: December 02, 2010, 09:58:19 PM »

with those huge stuff sack setups on the fork, it doesn't even look like you're using the cage at all.  Surely those loads are too wide, and I can't quite see any of the aluminum, but perhaps the angle is wrong and they do indeed provide support.  If anything, it just seems like there would be a "bottom" to prevent the gear from sliding downward on the fork

It's just the angle.  I'm sure the cage can handle this load. After all it only weighs 3 lbs or so, but it is a little bulky and I'd worry about it snagging.
Logged

  Pages: [1]
Reply New Topic New Poll
Jump to: