Pages: [1] 2
Reply Reply New Topic New Poll
  Topic Name: Bikepacking Tarptent Build (PIC Heavy) on: March 01, 2010, 12:51:30 PM
Niles


Posts: 11


View Profile
« on: March 01, 2010, 12:51:30 PM »

Hey everyone!

I decided that I wanted to make a bikepacking specific tarptent, and have been taking photos along the way in case everything worked out so I could share my method with you guys.  Well, everything worked out, so here I am. 

First off, I don't know if the way I did it was the best way, or even a good way, but it seems to have worked.  Where I started was Google Sketchup.  I got the idea out of my head and into a graphic.  Here are a front and back view of the concept:


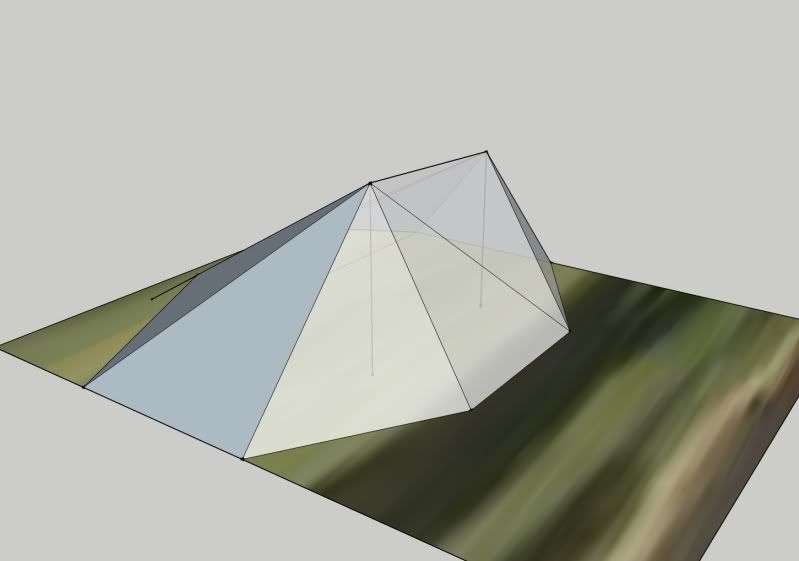
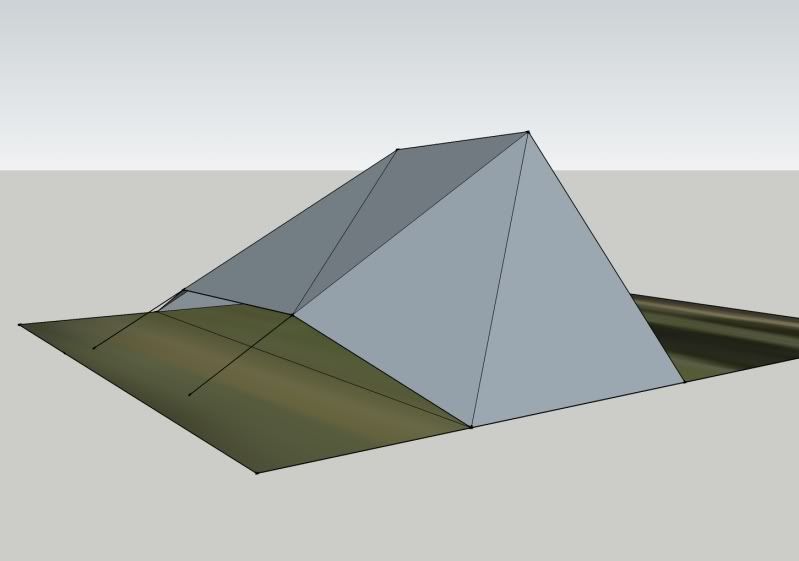
The supports for the tarp is the bike itself.  The two vertical lines you see in the front view are the heights of the apex of my wheels when the bike is turned upside down.  I figured that this setup would give me a lot of room with minimal setup.  The rear image shows the back side of the tent lifted off the ground for ventilation.  Ultimately my plan is to add a bug net insert with a silnylon floor.

The Process:

So here's how it went down.  I had a bunch of old $1 fabric from Walmart to use as my template material.  The whole purpose of the build I'm describing in this post is to create a template or pattern that I can transfer onto the actual fabric that I'll be using for the final product.  When I'm finished with this build, I'll take everything apart so I can trace the flat panels onto the actual fabric.  This free's me up to do whatever I want with this fabric.  If you look closely you'll see that I have written all over the tent, making notes to myself, or drawing diagrams and recording measurements:


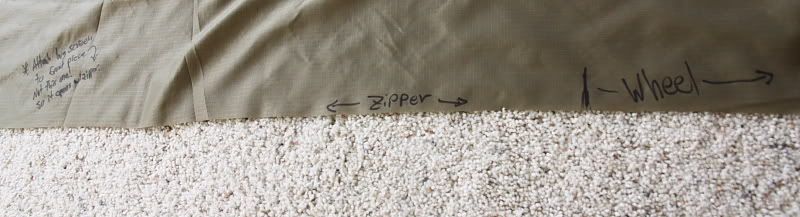
As I went through this whole thing, I always had a sharpie in my pocket, and it was immensely helpful.

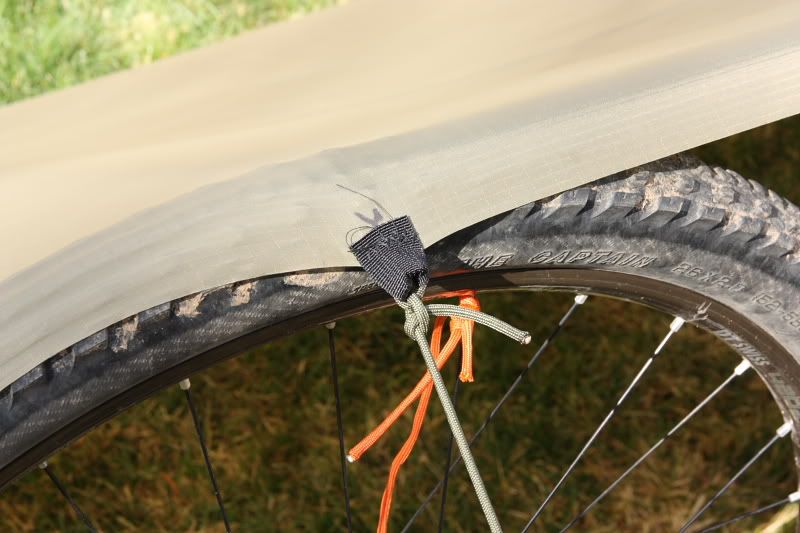
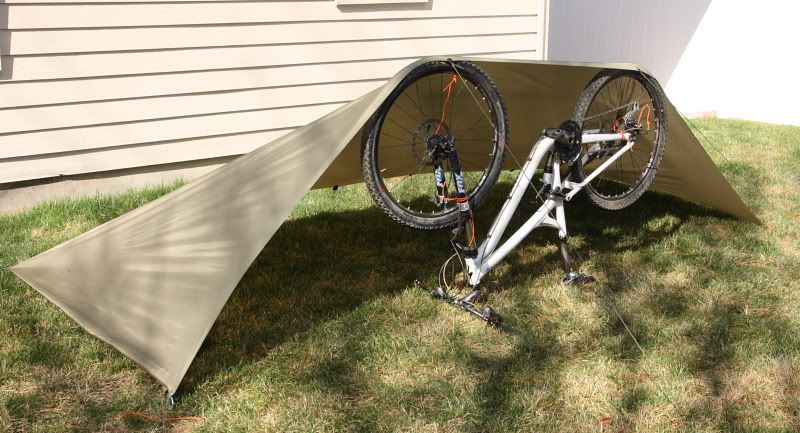
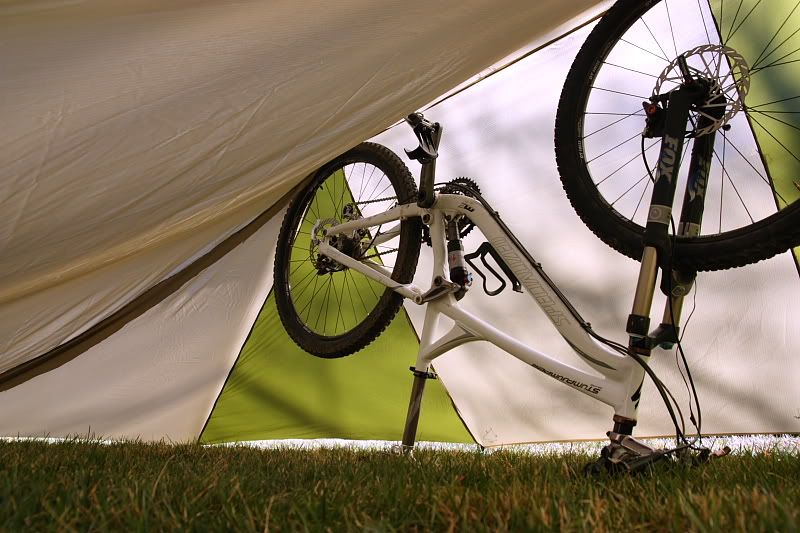
So, Step 1: I took my $1 nylon and draped it over the bike, just like the back panel would be in the picture.  Then I took my sharpie and marked out places where I thought I might need tieouts.  Then I went back to the sewing machine and threw in a bunch of loops of webbing so I could start experimenting with "pitch-points".


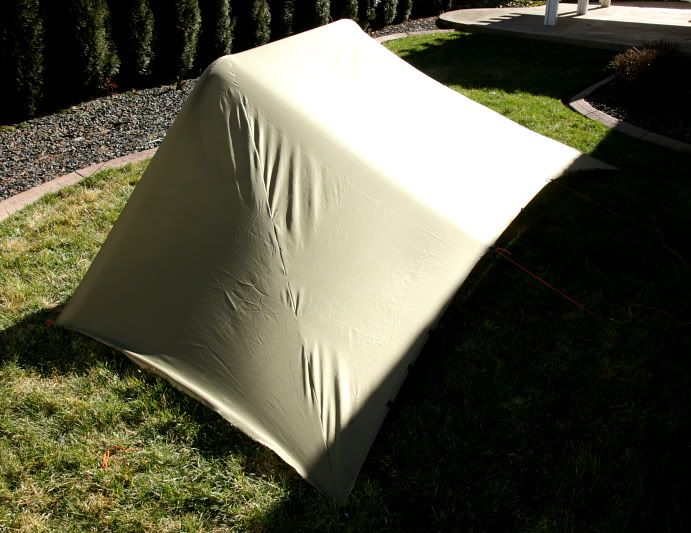
Then I went back to the bike draped it again, and staked it down to the ground:


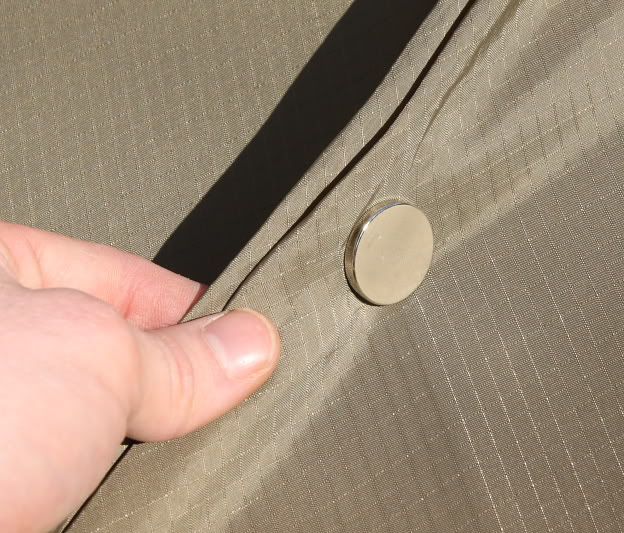
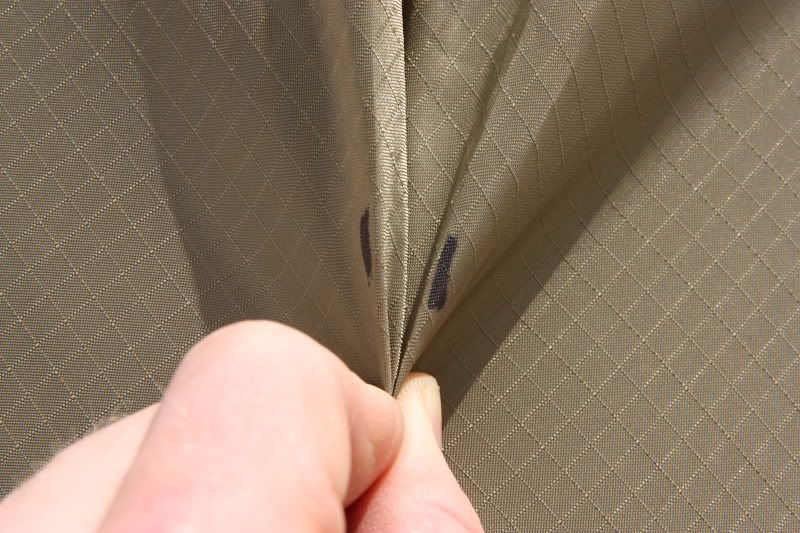
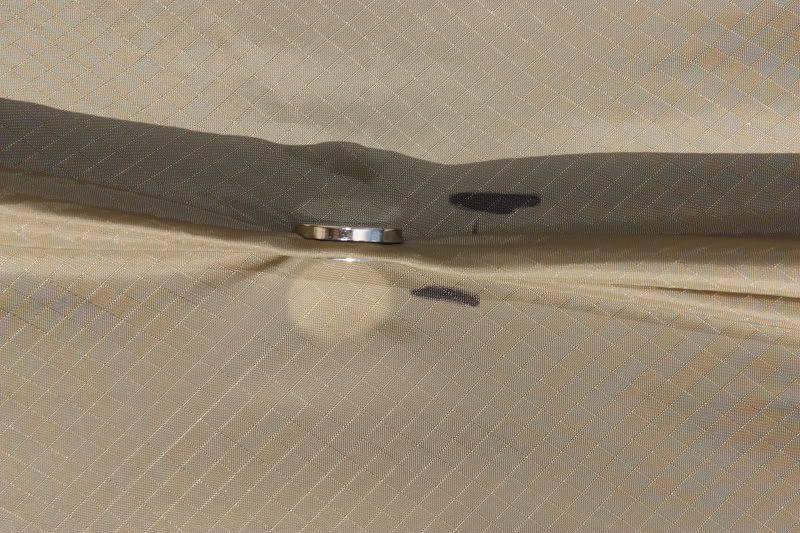
The next step was to figure out how to shape the side panels.  If you notice in the Google images above, the side panels are made of two triangles, which is a necessary geometrical feature in order to keep the material from sagging.  So to discover the shapes of those triangles I went to the sides of the tarp and gathered the excess fabric, and "pinned" the panels together with magnets (in hindsight, I really should have just used pins to hide the excess fabric).  Then I drew lines on each side of the newly forming triangles representing where the two panels should meet:

Gathering the excess (saggy) material:


Drawing lines representing where the two panels should come together:


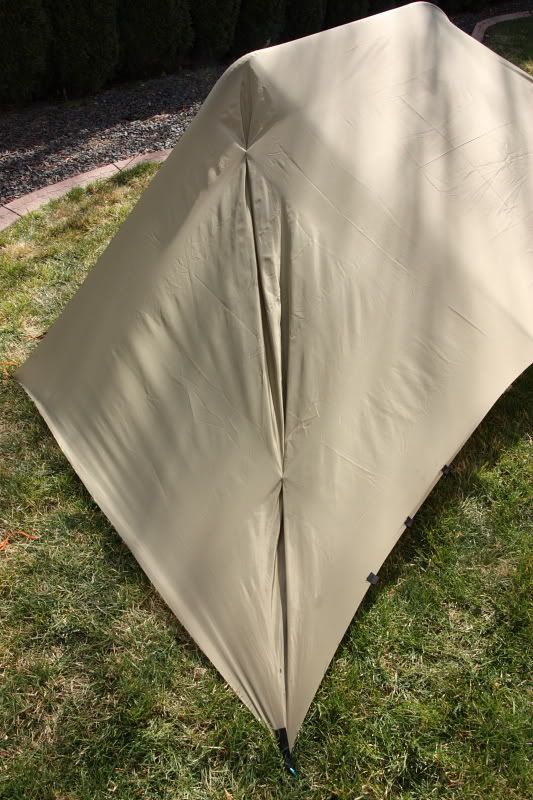
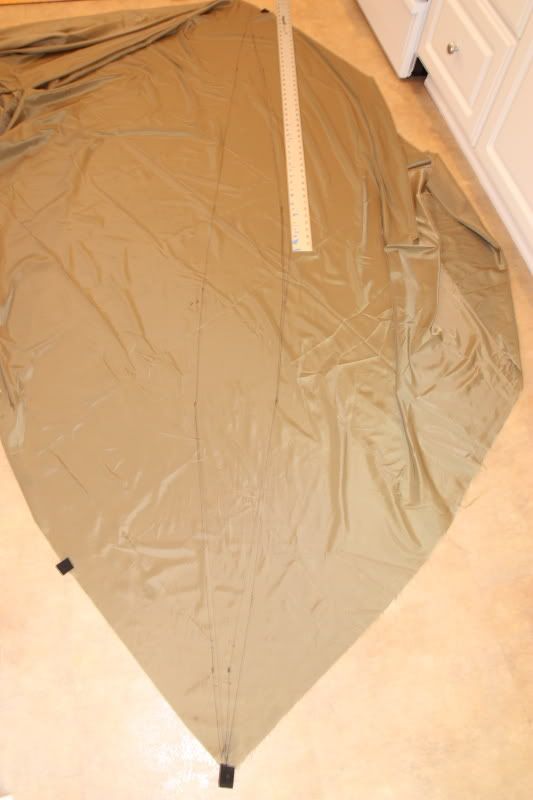
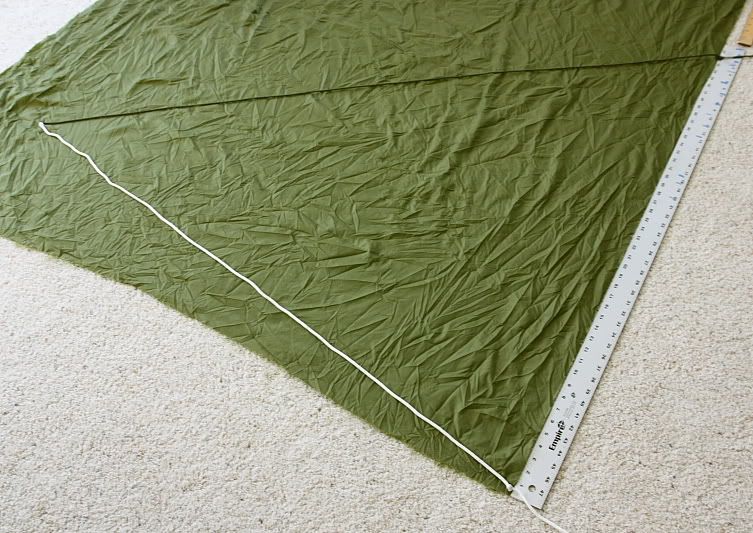
This next bit was interesting, and I'm not sure how correct it was.  I took the whole tarp down and laid out the fabric to connect the lines I made on the side panels.  The picture below shows the final result.  The lines I made ended up making a curve on both sides, which I tried to make as symmetrical as possible:


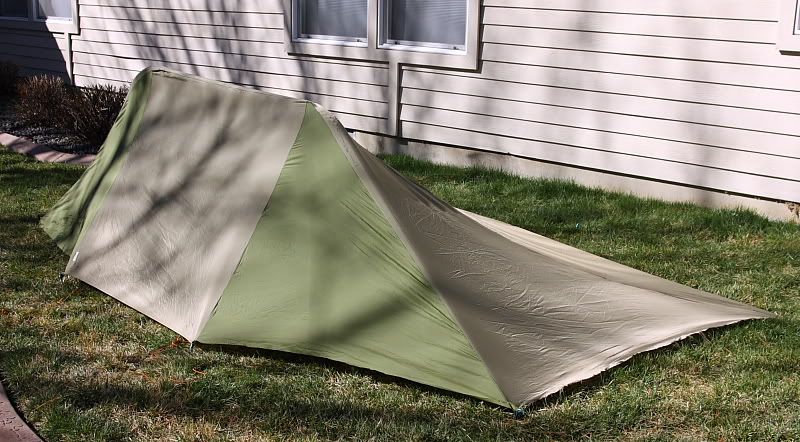
I then cut on one of the lines and sewed the cutout panel to the other one, on the opposite line.  Then I went back out and re-pitched the tarp:


I think the wrinkles are from failures in symmetry.  A step that I might add is to line up both curves, one on top of the other, and make them match perfectly...I think I moved a little too quickly through this step.

Note: For a summer, or warm weather tarp, you could be done right here.  Maybe add some kind of a beak to the front if you think you'll get shifting rain in the night, but all in all this isn't a bad tarp setup as is.

So, with the back side done, it was time to move onto the front.  I took some measurements and ended up cutting a 45"X45" square and pinned it to the front middle panel to pitch it:


Then, the last step was to measure out the front/side triangles.  One side was 45", the other side was the length of the front edge between the tire and the ground, and the other side was the length between the square piece and the front outside corner.  With those measurements in hand, and now having run out of fabric, I went to a new piece of fabric and cut out the triangles:


All those wrinkles in the fabric above made for a sloppy bit of measuring.  Make sure that your fabric is nice and flat before marking out your lines!

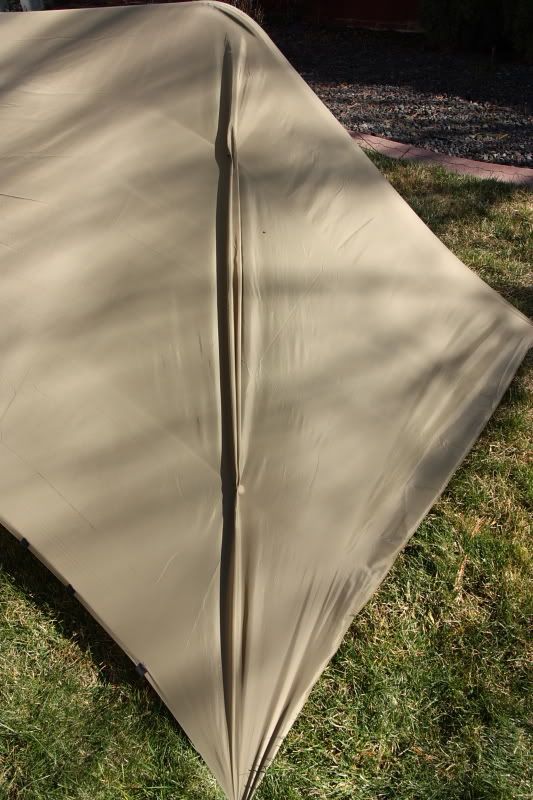
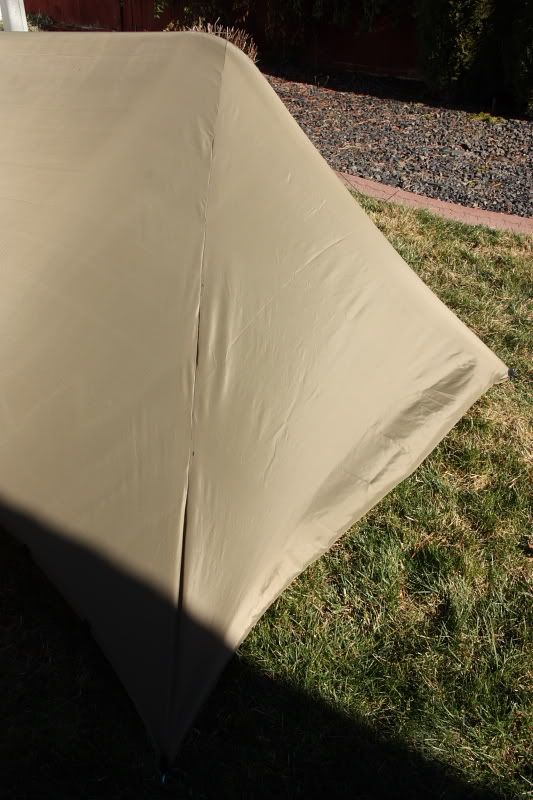
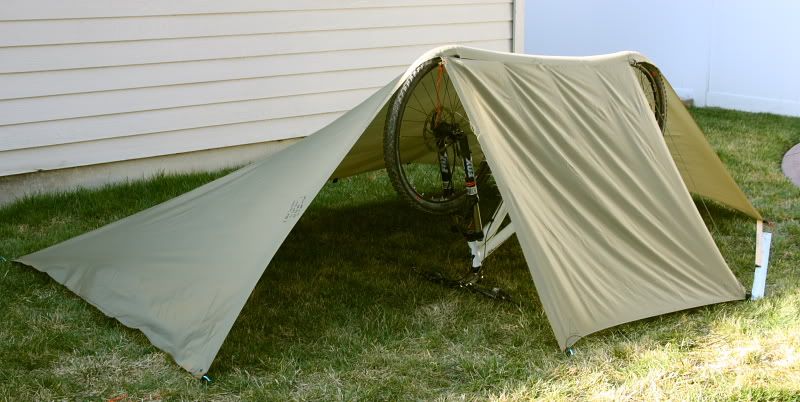
Then I sewed the triangle panels onto the front and re-pitched the tarp one last time:


As you can see from the above picture the back right corner is a lot farther out than it needs to be.  In the final version I will cut that down to remove the excess fabric.

Here's a shot from the inside:


All in all I'm really happy with the dimensions and the overall feel of the thing.  I just ordered some 1.1oz silnylon, and I'll be hunting for an adequate zipper to make a good entrance door, and then I'll put the whole thing together.

The final piece to the puzzle will come when I design the bug net insert.  My hope is to make something that I can just attach to the inside so I can leave it at home when I know bugs won't be an issue.

I hope this was useful to someone.  Feel free to ask questions.  I'll try to remember to post up the final product when I get it finished.

Cheers!
Logged

  Topic Name: Bikepacking Tarptent Build (PIC Heavy) Reply #1 on: March 01, 2010, 01:51:07 PM
Slim


Location: Duluth MN, North Central USA
Posts: 240


View Profile
« Reply #1 on: March 01, 2010, 01:51:07 PM »

Nice job! It looks huge in there! How many people would you sleep in there? Or, if it is just one, would you make it any smaller to save weight?
Logged

  Topic Name: Bikepacking Tarptent Build (PIC Heavy) Reply #2 on: March 03, 2010, 11:09:05 PM
Rob


Location: Rancho Santa Margarita, Ca
Posts: 205


View Profile
« Reply #2 on: March 03, 2010, 11:09:05 PM »

Curious how much you think it'll end up weighing.  Did you happen to weigh the practice one?
Logged

  Topic Name: Bikepacking Tarptent Build (PIC Heavy) Reply #3 on: March 04, 2010, 06:54:09 AM
intheways


Posts: 129


View Profile
« Reply #3 on: March 04, 2010, 06:54:09 AM »

That's an awesome idea.  I've been debating which tent to get when I tour/bikepack with my wife, and that sort of design may have ended the search.

Thanks for the pics
Logged

  Topic Name: Bikepacking Tarptent Build (PIC Heavy) Reply #4 on: March 04, 2010, 08:41:20 AM
jeremy11


Location: Grand Junction, CO
Posts: 263


View Profile WWW
« Reply #4 on: March 04, 2010, 08:41:20 AM »

great stuff!  also a great bike theft deterrent at night.
Logged

  Topic Name: Bikepacking Tarptent Build (PIC Heavy) Reply #5 on: March 04, 2010, 10:01:30 AM
Marshal


Location: Colorado
Posts: 951


View Profile WWW
« Reply #5 on: March 04, 2010, 10:01:30 AM »

Humm, I experimented with something similar last year during my CTR prep…..

The rain fly from my Seedhouse SL2 fits quite nicely over my bike when it is standing upside down on its handlebars and with the front wheel removed.   I placed my helmet, covered with a empty stuff sack, on the fork ends, tinkered and adjusted and was able to get the rain fly nice and taunt, lots of room on each side of the bike (enough for two), zippered door fully accessible etc..  I tried the bike via fly directions both ways and played with minimum stakes, needed 4, etc etc.  Anyway, with a bit of trial and error a this std 2 man rain fly will work.  Like any system with a bit of practice it would quickly become second nature to set up. And its slightly less than 2 lbs for a large waterproof cover.  So if two riders were to share that’s less than 1 lb per rider!

I do think this is a viable method; however at the end of the day, for me, it was not worth the bother of using a system that puts your bike inside your tent/tarp for the CTR.   Under other conditions I could see using it, say if you want to stay light and are on a longer ‘2 rider’ tour and/or plan on hitting a lot of rain and also want to take the time to set up a tent-style camp.  But under those conditions, personally I would probably pay the weight penalty and use my full 2 man tent set up and get the advantages of a floor and bug netting.
Logged


  Topic Name: Bikepacking Tarptent Build (PIC Heavy) Reply #6 on: March 04, 2010, 03:51:04 PM
Niles


Posts: 11


View Profile
« Reply #6 on: March 04, 2010, 03:51:04 PM »

You know, I think the tarp looks a lot bigger in the pictures than it is in life.  It will only sleep one person...two if you spoon.  The weight of the test fabric was 29oz.  I expect the final version to weigh in around 24oz...which isn't too bad for a fully enclosed single wall shelter.  That doesn't include the bug net and floor that will eventually be added though.  But even these items will be modular.  I'm planning on making the bug net hang from the inside so it will only enclose the upper half of my torso, in order to save weight. 

The setup is really simple.  It takes less than a minute to get everything staked out and tight.

I'm starting to debate, if I should make it fully enclosed or not, though.  All it really needs on the bike side is a little bit of a beak sort of thing to direct rain away from the inside.  If I cut out the fully enclosed side, I could save a lot of weight and a zipper.  What do you think?
Logged

  Topic Name: Bikepacking Tarptent Build (PIC Heavy) Reply #7 on: March 05, 2010, 03:08:51 AM
AZTtripper
Moderator


Location: Tucson, AZ
Posts: 1724


View Profile
« Reply #7 on: March 05, 2010, 03:08:51 AM »

Looks good I like the way you started but I would have quit after the first big piece. Keep it simple and light you should be able to stay dry with an open sided tarp. I do like incorporating the bike though I did a practice set up with my poncho/tarp http://www.seatosummit.com/products/display/6 yesterday looked like pretty good coverage and light at 12 oz.

How much weight do you have in stakes would it be possible to use string and natural objects in the field.
Logged

  Topic Name: Bikepacking Tarptent Build (PIC Heavy) Reply #8 on: March 05, 2010, 07:27:16 AM
jeremy11


Location: Grand Junction, CO
Posts: 263


View Profile WWW
« Reply #8 on: March 05, 2010, 07:27:16 AM »

you should also try setting it up without the bike, using poles or sticks or overhead branches to see if it would also be useful for backpacking, or you could get more usable space without the (wet, muddy) bike in there.
Logged

  Topic Name: Bikepacking Tarptent Build (PIC Heavy) Reply #9 on: March 08, 2010, 06:26:11 PM
Niles


Posts: 11


View Profile
« Reply #9 on: March 08, 2010, 06:26:11 PM »

Tarp is finished. 11.5 oz by itself. Hopefully the weather will be nice enough tomorrow to set it up and seal the seams. If so I'll snap some pics.
Logged

  Topic Name: Bikepacking Tarptent Build (PIC Heavy) Reply #10 on: March 10, 2010, 05:39:32 AM
AZTtripper
Moderator


Location: Tucson, AZ
Posts: 1724


View Profile
« Reply #10 on: March 10, 2010, 05:39:32 AM »

That would do it for me I think. Unless you needed the extra walls for privacy. One of the advantages of tarp tents is having one side open and getting better ventilation then a tent. I bet you could stay dry under there even if you had to adjust it into the wind at the worst you might loose some ground but I bet you could stay dry.

Then you were talking about bug netting but only a small piece, how about a bigger area of that if you are going to have to deal with bugs having room to get away from them would be nice.

I used the bike idea this weekend using a fence, two rocks and the bike. The weather was nice and I ended up raising the whole thing on the fence end. I haven't used this tarp in rain yet but I am pretty sure it will do the job.


* Fence line camp.JPG (381.91 KB, 1024x768 - viewed 10000 times.)
Logged

  Topic Name: Bikepacking Tarptent Build (PIC Heavy) Reply #11 on: March 10, 2010, 08:01:35 AM
12wheels

Bolder Bikepacking Gear


Location: Boulder, CO
Posts: 211


View Profile
« Reply #11 on: March 10, 2010, 08:01:35 AM »

Nice.  A 5x8 or 9ft tarp, like both you and Niles basically use, works fine in rotten weather if rigged correctly.  You can anchor two sides down, 3 in Niles case, to block wind or rain and still have plenty of room for your bag and gear.  Niles addition of a beak over the bike adds a little more protection if the wind shifts while it's raining.   Using the tarp with a simple bivy, like the 8oz +or- SMD Meteor, adds more protection from the elements, eliminates the bug problem, and serves as a ground cloth.


* 12 109.jpg (124.39 KB, 640x480 - viewed 10886 times.)

* 12 092.jpg (127.88 KB, 640x480 - viewed 12912 times.)
« Last Edit: March 10, 2010, 08:13:08 AM by 12wheels » Logged


  Topic Name: Bikepacking Tarptent Build (PIC Heavy) Reply #12 on: March 10, 2010, 06:17:12 PM
Mike Brown


Posts: 93


View Profile
« Reply #12 on: March 10, 2010, 06:17:12 PM »

Speaking as somebody with no interest in DIY kits.
I'd consider buying this if it was easy to set-up and cost less than 100 dollars.

Just saying...

AZT tripper- i'd need the side walls for blowing rain and high winds, not privacy.
Once my camp is set-up, I do not want to fuss with it anymore.  Time to relax...


Logged

  Topic Name: Bikepacking Tarptent Build (PIC Heavy) Reply #13 on: March 11, 2010, 04:13:02 AM
AZTtripper
Moderator


Location: Tucson, AZ
Posts: 1724


View Profile
« Reply #13 on: March 11, 2010, 04:13:02 AM »

Pitch the tarp lean to style into the prevailing winds 9 time out of 10 you won't need to move it. If you close off all sides you are likely to get condensation.

To each his own, I like the first half of Niles creation my point was that an open air tarp set up has its advantages. I also enjoy relaxing in camp, but I also enjoy practicing tarpology.

Here's a good one this was the add at the bottom of the page as I made this post http://www.tarpaflex.com/?gclid=CPvC2o_VsKACFRdSagodPyPhSw

Logged

  Topic Name: Bikepacking Tarptent Build (PIC Heavy) Reply #14 on: March 11, 2010, 11:23:44 AM
Niles


Posts: 11


View Profile
« Reply #14 on: March 11, 2010, 11:23:44 AM »

Alright, so here's the update.  Things didn't go exactly as planned.  I had hoped that my template tarp would just easily transfer over to the new material, and voila, I'd be done.  It turns out that the two materials were too different.  The polyester nylon I used for the pattern stretches a lot more than the nylon I used for the finished product.  So, the geometry of the two didn't translate.  Because of this, I gave up pretty early on on trying to make this latest tarp the final version...thus it is now the new template.

In some of the pictures below you can see seams that look out of place...especially on the beaks.  These were the particularly troublesome areas that I needed to give quick fixes to.  The biggest problem was with the wheels.  What made things interesting is that instead of there being a straight line from the center of the top of the wheel down to the corner tie-outs, it is a curve to a straight line as the tarp wraps around the wheel.  So the beaks have to be a funny shape.

Anyway, I got things figured out now, and I'll be taking this tarp apart too in order to have a solid template to work off of.  Luckily I ordered my fabric from Noah Lamport, who's minimum order is 10yds, so I have enough fabric to make another one.

In the pictures you'll see that I went ahead and pitched the tarp with extra "tie-outs" on the edge and the back side.  I used my hiking poles to support these tie-outs, but they could just as easily have been sticks, or left out completely.  In the final version I will laminate tie-outs in 4 places to offer this pitching style...it really does add a lot of luxury inside the tarp by creating loads of room.

Here are the pictures:


A shot from inside:


Another thing you might notice is that I didn't cut the sides at all, to make two triangles on the head and foot ends.  I decided that I could get an adequately tight pitch by changing the angle of the corner tie-outs, which really shortened the build time and limited the number of seams for sealing (and the potential of leaking/failure).  By adding the optional tie-outs on the body of the tarp, an extremely taught pitch will be easy if there are some sticks lying around.

What do you think?
Logged

  Topic Name: Bikepacking Tarptent Build (PIC Heavy) Reply #15 on: March 11, 2010, 11:58:19 AM
jeremy11


Location: Grand Junction, CO
Posts: 263


View Profile WWW
« Reply #15 on: March 11, 2010, 11:58:19 AM »

did you read the recent silnylon laminating article at backpackinglight?
Logged

  Topic Name: Bikepacking Tarptent Build (PIC Heavy) Reply #16 on: March 11, 2010, 12:02:20 PM
Niles


Posts: 11


View Profile
« Reply #16 on: March 11, 2010, 12:02:20 PM »

Indeed...that's where I got the idea of laminating the pullout things.
Logged

  Topic Name: Bikepacking Tarptent Build (PIC Heavy) Reply #17 on: March 11, 2010, 12:38:48 PM
AZTtripper
Moderator


Location: Tucson, AZ
Posts: 1724


View Profile
« Reply #17 on: March 11, 2010, 12:38:48 PM »

Looks cool and all of that is only 11.5 oz I would consider putting one of these together how much did you spend on the fabric?
Logged

  Topic Name: Bikepacking Tarptent Build (PIC Heavy) Reply #18 on: March 11, 2010, 01:07:15 PM
bmike-vt


Location: Horgen, Switzerland
Posts: 1122


View Profile WWW
« Reply #18 on: March 11, 2010, 01:07:15 PM »

nice work. i'm always impressed with DIY tarp / tent / gear stuff.

can you use the extra tie outs without the poles? (or sticks, whatever?) - would you still gain something?
Logged


  Topic Name: Bikepacking Tarptent Build (PIC Heavy) Reply #19 on: March 11, 2010, 01:46:27 PM
Niles


Posts: 11


View Profile
« Reply #19 on: March 11, 2010, 01:46:27 PM »

AZTripper: The fabric was from Noah Lamports and was about $3/yd before shipping, with a minimum of 10yds.

bmike-vt: I don't think you'd gain much because you'd have to pull down.  The longer you make the tie-out cord, though, the more you will gain.  The obvious way to avoid using sticks is to use trees or other features (e.g. fences, as in the above post, or bushes, etc). 
Logged
  Pages: [1] 2
Reply New Topic New Poll
Jump to: