Pages: [1]
Reply Reply New Topic New Poll
  Topic Name: Bikepacking Rig Build Thread: The Buckskin Buccaneer on: January 24, 2013, 12:45:14 AM
Ty


Posts: 19


View Profile
« on: January 24, 2013, 12:45:14 AM »

This build thread is dedicated to the evolution of my bikepacking rig from start to wherever the project ends up.  This project is something I've been thinking about for a while but haven't had the resources to pull off until recently.  

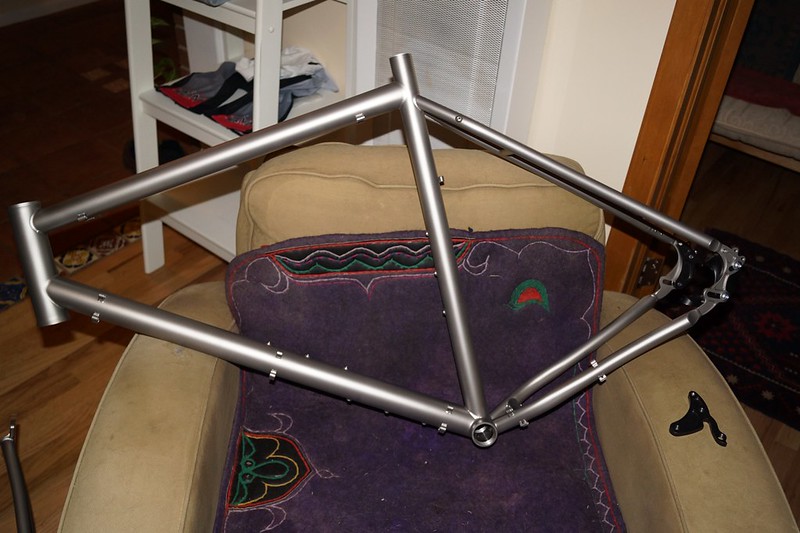
At this point the project has just started and I got word my new frame is going to be here next week.  Hot off the frame jig...


I'm a big guy at 6'5 with a huge inseam coming in at just under 39.5" so not many off the shelf bikes fit me well.  I spent lots of time researching blogs and looking at bikes like the Fargo and Ogre but they just don't fit right... despite Surly making a truly tall man size 24" Ogre.  My beef with with the Ogre is the bottom bracket height and my love of proportionate length cranks.  So the seed was planted to build up a rig that would take me into the unknown and back with all the features the cool rigs have and the fit I like.

A big inseam means I need lots of seat post showing on a stock frame and the bars are always too low relative to the seat.  My Dad's 19" Fargo feels like a kids size bike, my knees at the top of the stroke are way above the top of the bar.  To compound matters I firmly believe that proportionate length cranks work for me and I enjoy riding a bike with crank length from 20.5% to 21.5% of my inseam.  That translates into crank lengths of 205mm to 215mm and requires a bottom bracket height much higher than a regular frame.  The trick is that the longer crank allows for a shorter distance between the bottom bracket and seat.  My road bike has 215mm cranks with 31.5mm BB drop and a Specialized Allez has 175mm cranks with a 67.5mm drop.  Cranks got 40mm longer and the bottom bracket moved up 36mm meaning the seat stays about the same so my COG isn't goofed up.  The proportionate length crank idea even works for guys with a 33" inseam and puts them in a 170-180mm range... stock leg length means lots of stock bikes to pick from.  I'm going to run 205-210s on this bike.  Shorter than the road bike because mountain riding requires quicker transitions in cadence but still in my sweet spot range.

Knowing I was planning to go with a custom frame I agonized over the details and options spending plenty of time thinking about what I wanted after having done a few trips on other bikes.  Here are a few of the features I added to the design.


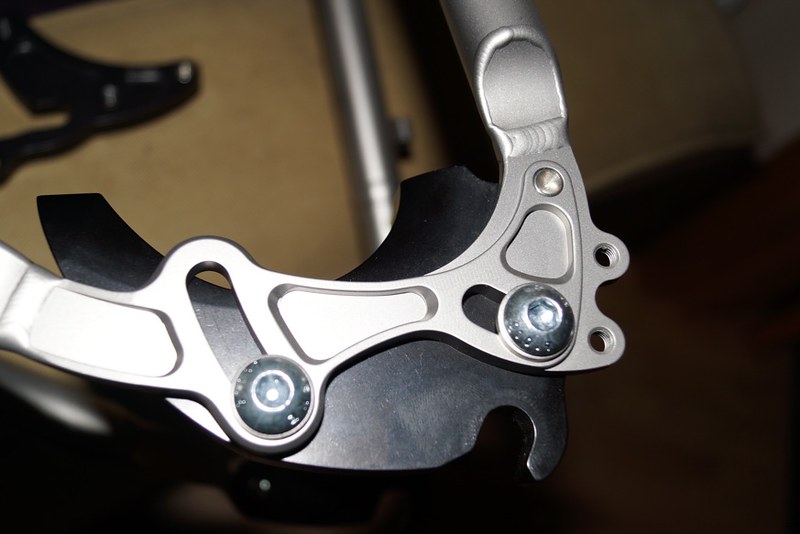
The picture above shows the Paragon Rocker dropouts with eyelets for a rack and fenders.  They feature an adjustable chainstay length with an aluminum dropout plate which can be swapped out for different versions.  Some of the options include post mount or ISO disk brakes along with setups for single speed, geared, and internally geared hubs.  This part is truly one dropout to rule them all.  The frame is setup with eyelets for racks and fenders.  This is the only dropout that would allow for adjustable chainstay length and good locations for eyelets on the dropout side.  Traditional slider dropouts don't do this well because of the disk brake caliper location.


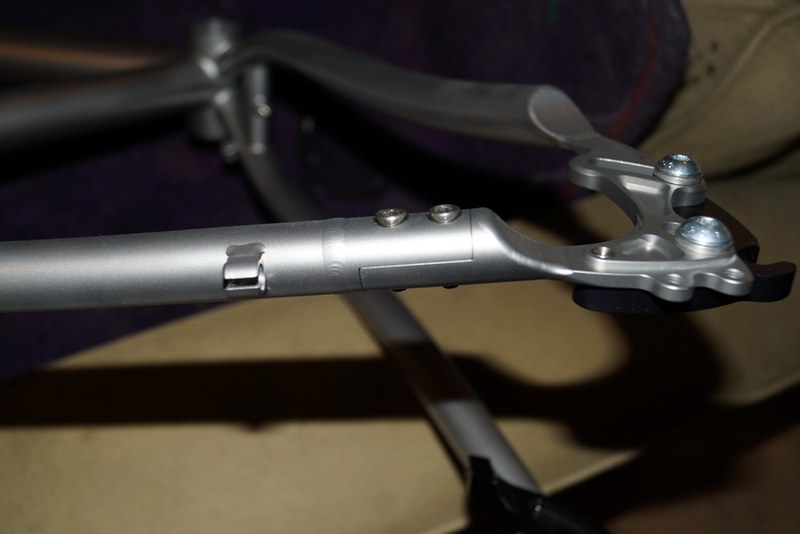
The next feature I added was a seatstay break from Paragon so I had the option of a belt drive.  The Gates belt drive is something I've always been curious about, especially when paired with a Rohloff.  The biggest issue with the belt is how to get it on and off the bike.  This requires a split seatstay because belts don't have a master link.  Rohloff, belt drive, cable pull disk brakes... I'm going to get board someday looking for parts of this rig to plan a maintenance cycle for.  Untill then it is a 2x10 setup from my old bike for now.


I spent quite a bit of time reading http://www.whileoutriding.com/ and http://gypsybytrade.wordpress.com/.  That nifty Salsa Anything Cage kept popping up in pictures looking useful.  Even more so now that Salsa is reworking the next production batch to have more beef for heavy loads.  Naturally I had all the water bottle spots done with the triple eyelet configuration so they would be compatible with Anything Cages.  A third water bottle location has been added to the bottom side of the downtube.

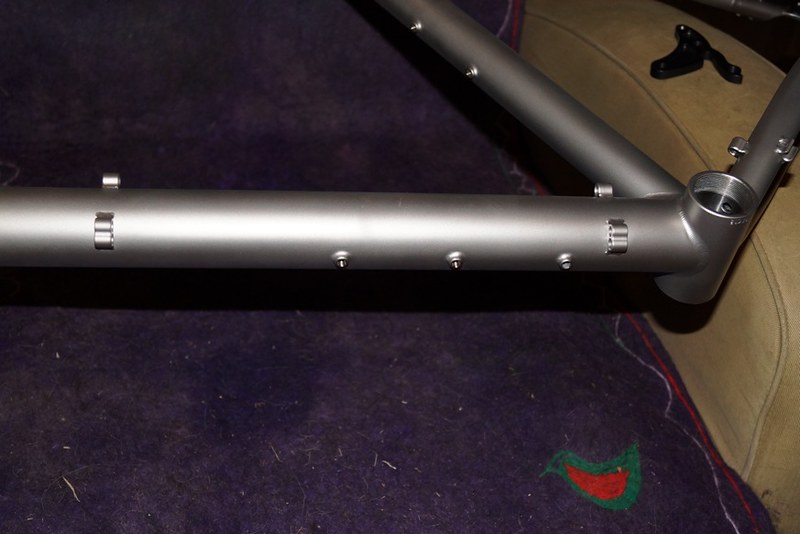
In addition these two photos above/below show some of the cable routing options.  I've had all the provisions to cleanly route a Rohloff hub included in the frame.  I really want to try a belt drive Rohloff but the bike is going to have standard gears to start and the cable routing for that is under the top tube.  The disk brake routes on the top side of the downtube with the double guides on the bottom side for the Rohloff.


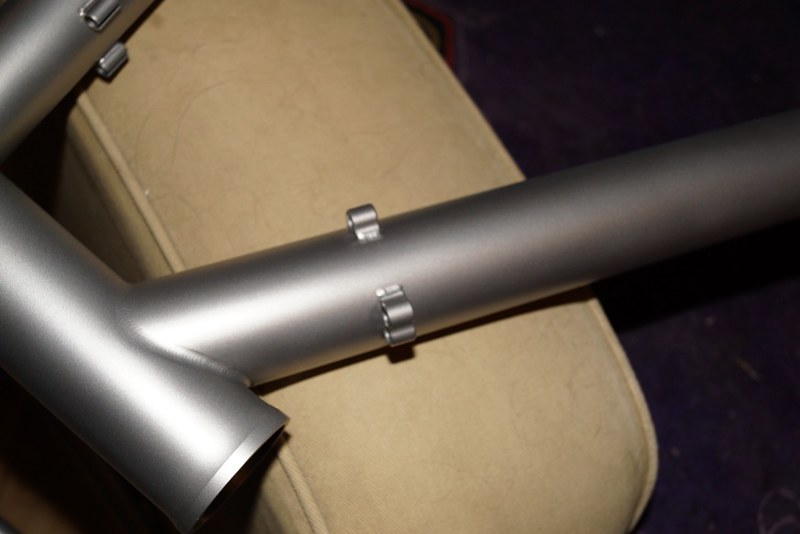
I went with the 44mm headtube up front because I wanted the option to run a tapered steer tube fork.  There is a nice Niner brand carbon rigid with a 470mm axle to crown featuring a tapered streer tube and 15mm axle.  My buddy worked at Niner in an engineering role.  He beat the crap out of that fork with a ball peen hammer and then ran fatigue tests on it using an instrumented test cell to apply and measure force.  According to his experience that thing passes multiple European test cycles after some hammering.

On the suspension side of things the nominal geometry is setup for a 90mm Fox fork.  That boils down to a 490.8mm axle to crown with a 71.5 head angle.  Subtract the 20% of 90mm travel equals 472.8 axle to crown for a baseline rigid setup.  That will allow me to run just on the steeper side of my 71.5 head tube angle (when A-to-C=491mm) for a rigid setup/90mm sag point which is what I want.  I'm plenty happy with a 72 head angle rigid off road.  On the slacker side of things I can put on a 100mm fork at 20% sag and get some extra front squish.  If I want a little slacker rigid setup I can go with a +5 King crown base plate and headset or even a White Brothers Rock Solid in the 490mm length.  Bigger bikes with a long wheelbase and 29 inch tires tend to handle slow so I'm not trying to slacken anything up too much.  I previously did a garage built steel monster cross with 200mm cranks and 72 head angle rigid.  It was good handling and maybe just a little slow even when I was bouncing through stuff and hoping for the best.  If you've been on a rigid you know that bump and grind prayer!  

I can't wait to start getting bags on this and shaking it down loaded with gear!


« Last Edit: January 24, 2013, 12:54:45 AM by Ty » Logged

  Topic Name: Bikepacking Rig Build Thread: The Buckskin Buccaneer Reply #1 on: January 25, 2013, 08:38:39 AM
annoying crack


Location: brussels
Posts: 127


View Profile
« Reply #1 on: January 25, 2013, 08:38:39 AM »

Nice post!
Can't wait to see this bike being build up. I looked at the frame and thought: "roadbike'.  icon_biggrin
One question: Where do you find cranks that long?
Logged

  Topic Name: Bikepacking Rig Build Thread: The Buckskin Buccaneer Reply #2 on: January 29, 2013, 12:28:11 AM
Ty


Posts: 19


View Profile
« Reply #2 on: January 29, 2013, 12:28:11 AM »

The first front fork option I'm going to try is the Fox F29 RLC in 100mm of travel.  I'm starting with my fully crapped out F29 in 120mm of travel.  Due to a problem with F29s it collected all of the air spring side oil on top of the piston.  I never got full travel out of it and it road like a brick early on.  I didn't get my head around the problem until a local guy I know through a buddy schooled me.  He is "that guy" who is constantly rebuilding and adjusting suspension parts on his mountain bikes and conventional dirt bikes.  So I called Fox and told them I wanted the wiper seal upgrade like he said.  Sure enough the tech on the line was familiar with the problem and sent me the part free of charge.  Here is a quick run down of the seal swap on my F29.

All setup and ready to investigate the problem.  The Fox manuals were accurate despite the fact that the pictures are generic.  It might not look like your shock hardware or be labeled correctly in the picture but it all bolts together the same in my case.

See here for the manuals
1.  Shock Table of Contents
http://service.foxracingshox.com/consumers/Content/Service/Forks/1.0_Fork_Disassembly.htm

2.  F29 RLC Instructions
http://service.foxracingshox.com/consumers/Content/Service/Forks/F-Series/F29erRLC_RL.htm


The picture below shows the following items

1.  32mm stanchion seal kit on right
2.  Replacement seals in middle bag
3.  Float Fluid
4.  Race Tech shock fluid with extra slick added compound in 2.5-5 weight
5.  Race Tech super slick additive seal grease
6.  20mm fork spacer for negative spring.  Turns 120mm into 100mm of travel.


This is a picture of the new wiper seal and part number up close.


Start taking the fork apart following the Fox instructions from the links above.  Note, you'll need some small Allen keys of 2 and 1.5mm sizes.


When you are done pulling apart both sides.  This is what you end up with for hardware.  It is possible to disassemble only the air spring side for the seal swap.  I pulled both damper and spring legs apart to fully grease, swap seals, and generally investigate.


Note the new fork seal shown in the left near the area where it will be installed.


The picture below shows the fluid which came out of the shock.  On the right side it looks like a mix of float fluid and regular suspension oil.  The left side is what came out of the dampener side by comparison.  It is clean suspension oil.  The stuff on the right was entirely transferred to the top of the piston.  Only a small amount came out from below the piston seal.


The picture below shows the new scraper seal installed and the felt ring next to it.  The felt ring seemed very loose in the gland and unlikely to be effective.  The blue seal sits very nicely in the gland and looks like it is going to be a sweet upgrade.  I assumed the blue scraper seal points with the flair open to the oil bath.  That way it will trap oil attempting to rush past is as the flair is forced open and closes more tightly on the bore diameter.

Logged

  Topic Name: Bikepacking Rig Build Thread: The Buckskin Buccaneer Reply #3 on: January 29, 2013, 12:45:57 AM
Ty


Posts: 19


View Profile
« Reply #3 on: January 29, 2013, 12:45:57 AM »

Nice post!
Can't wait to see this bike being build up. I looked at the frame and thought: "roadbike'.  icon_biggrin

LOL, the head tube is pretty long.  I'm stoked on frame bag real estate.  Scott at PR is going to be rolling on the bag once I get a template made.

Quote
One question: Where do you find cranks that long?

A few places are making long cranks.  Lennard Zinn out of CO and High Sierra Cycle Center are making USA cnc'ed outboard bottom bracket setups.  DaVinci Tandems and High Sierra make square taper stuff.  There is also JK brand which is an import Zinn found based on the ISIS bottom bracket.  Sizes are available all the way from 180mm up to 220mm in 5mm increments.  The out board bottom bracket stuff from Zinn is what I have on the road bike.  From what I understand it is all CNC out of 7075 and then shot peened to improve fatigue life.  I'm not sure on the details but rumor was they did some actual testing at well known crank companies facility to help prove out the design.
Logged

  Topic Name: Bikepacking Rig Build Thread: The Buckskin Buccaneer Reply #4 on: February 26, 2013, 01:39:42 AM
Ty


Posts: 19


View Profile
« Reply #4 on: February 26, 2013, 01:39:42 AM »

The build has progressed in spite of life's challenges!   Here is where the 20mm spacer gets installed to turn a 120 fork into 100.  Just below the shaft collar on the right and above the spring.  Snaps into place over the main shaft and made from plastic of some sort.


McMaster is great if you live in an urban area.  They have a will call spot here in LA.  I love ordering the most random grab bag of stuff and having them tell me in a routine fashion it is available for will call in just 1 hour on a Saturday.  My shock takes a 30 ml shot of fluid...


I love this tool.  I've used several different improvised pullers in my day and this thing is butter.  The fork is in the background after I finished the rebuild.


With the old crown race removed it was time to install a King reducer style crown race.  This will allow me to run my suboptimal 1.125" steer tube fork on the new bike.  C'est la vie, I think a niner carbon fork in 1.5" steer tube with the 15mm thru axle 36 hole SON hub is going to be the long haul option.  Front shock is sport touring mode lol.  A little Phil Wood grease and the king install tool gets the job done using a mallet and the driver tool above.


I put this headset press together from McMaster.  It has been used on several bikes and works great.  The install tool is from Chris King.  It has a flanged bushing hammered into the bore to reduce from 5/8 to 9/16.  A generic roller thrust bearing was also selected with top and bottom plates to ride above the bronze bushing and below the brass nut.  Did I mention my love of the McMaster Catalog?


Bushings and tools to install an Inset 7 headset.


Pressing in the headset...


After this point the photos get thin... it was mostly a thrash session where I mixed some drivetrain and brake parts from an old bike with a couple new things to finish the build.  Threw in a bonus triple front derailleur from the spare bin too.


Then after some thrashing and running around chasing loose ends this thing ends up coming together.  Sport touring mode.  Light wheels, suspension fork, triple.  XC bike with a options for rack, bags, and bottles.


The path forward is chasing down weak links like this.  I'm not a huge fan of button head cap screws.  They just don't have that much purchase length on the internal wrenching feature.  Some external wrenching 10.9 M8x1.25mm 16mm long screws are coming from McMaster to replace the stripped hardware.  The screw that stripped felt soft for the record when it went.  Not all hardware is equal and hopefully the McMaster stuff is a little better in HRC.

Logged

  Topic Name: Bikepacking Rig Build Thread: The Buckskin Buccaneer Reply #5 on: March 05, 2013, 10:08:13 PM
Ty


Posts: 19


View Profile
« Reply #5 on: March 05, 2013, 10:08:13 PM »

I'm totally nuts for quality fasteners (pun intended right?) and the McMaster solution was suboptimal.  Summit Racing has a great selection of made in 'merica ARP fasteners.  I went with the 12 point head which would allow me to carry a smaller and lighter wrench on the trail.  The conventional hex head is a 13mm in the M8x1.25 x 16 long size.  The 12 point is a 10mm wrenching feature size.  These ARP fasteners came in a "right sized" pack of 5 on top of it all.  That means 4 on the bike and one in the spare kit, just right.  The washers are included in the kit, note one side has sharper corners on the edges than the other and I installed them smooth side touching the frame.


Logged

  Topic Name: Bikepacking Rig Build Thread: The Buckskin Buccaneer Reply #6 on: March 05, 2013, 10:58:12 PM
Ty


Posts: 19


View Profile
« Reply #6 on: March 05, 2013, 10:58:12 PM »

Next up is learning about wheel building with a QR15 SON in 36 spoke up front and a used Rohloff found on Craigslist.  I think the Rohloff is far from broken in because the wheels look essentially unused based on the condition of tires and rock dings on the rims.  Oddly it is laced up to a set of downhill 26" wheels and I had to get the whole lot.  Just got lucky as it was somebody in a real nice West LA area selling it cheap and I stumbled across the external shift disk brake one I was looking for with a skewer style axle.  I also became fascinated with old Singer sewing machines and a 1957 201-2 was sourced on Craigslist from a lady in Long Beach in working order except needing a new bobbin winder o-ring.  It even had updated wiring to a more modern cord, fully gear drive and all metal construction in exchange for a single Bill Franklin.

This is a great resource for learning about wheel building.  I've also read the books by Jobst Brandt and Roger Musson so I feel like a good 16 hours of screwing around one weekend will net me something I can ride if I am patient and keep an eye on the spoke wrench.  The Musson eBook was the best read of them all, very practical and boils it down to a formula I'm comfortable experimenting with.

Wheel Building Primer
http://miketechinfo.com/new-tech-wheels-tires.htm

Vince J. Arcuri has a really well documented collection of videos on YouTube about sewing with very detailed information on the older Singers like the 201.  Just his 4 part series on the 201 is about an hour in length divided up in 15 minute segments. 
https://www.youtube.com/watch?v=c1rWeCpqfo0


Logged
  Pages: [1]
Reply New Topic New Poll
Jump to: