 Topic Name: Home made bike bag Topic Name: Home made bike bag
|
on: January 12, 2010, 08:46:21 AM
|
boddunn
Location: Kirby Muxloe, England
Posts: 86

|
 |
« on: January 12, 2010, 08:46:21 AM » |
|
Hi,
I'm going to make my own Epic Designs/Carousel Design Works style frame bag (if it works out anyway). Any thoughts on the strongest way to attach the Velcro? I was going to use an x-box stitch on the outside of the bag but that's not the way they seem to do it.
I guess the same kind of considerations would apply to sewing a backpack or other items you make yourself for hauling stuff so experience of any kind anyone can share from their own sewing projects would be very welcome.
By the way, I fully intend to post a step by step guide on how I wasted $60 of Dyneema Gridstop fabric plus hardware so you can all laugh at me!
Cheers,
Matt
|
|
|
|
|
 Logged
|
|
|
|
|
Topic Name: Home made bike bag
|
Reply #1 on: January 12, 2010, 09:02:14 AM
|
daveB
Location: Montpelier, VT
Posts: 78

|
|
« Reply #1 on: January 12, 2010, 09:02:14 AM » |
|
Its cleaner looking to have the velcro end inside the seam. I lightly sewed velcro to side panels first. Secondly assembled sides to "middle" strip. Thirdly, zig zag tacked over the seam allowance (only visible from the inside). Although it might be prohibitively awkward to do, you could instead of the third step zig zag tack through the side and velcro end. It may not matter much. Unless you force way too much stuff inside, the stress on the seams isn't all that great.  |
|
|
|
|
Logged
|
|
|
|
|
Topic Name: Home made bike bag
|
Reply #2 on: January 12, 2010, 10:13:32 AM
|
boddunn
Location: Kirby Muxloe, England
Posts: 86
|
|
« Reply #2 on: January 12, 2010, 10:13:32 AM » |
|
Hi Dave,
That's perfect, thanks for your quick reply. Your bag looks exactly what I have in mind although mine probably won't look quite so professional.
I see what you mean about looking cleaner and I guess it'll add more strength without extra weight compare to what I had in mind. Still not sure what to do with the seam, I might go for a felled seam. Think I'll just build a prototype and see how it looks as I make it, mistakes help you learn after all.
Matt
|
|
|
|
|
Logged
|
|
|
|
|
Topic Name: Home made bike bag
|
Reply #3 on: January 12, 2010, 10:24:50 AM
|
daveB
Location: Montpelier, VT
Posts: 78
|
|
« Reply #3 on: January 12, 2010, 10:24:50 AM » |
|
I used a plain seam with 3/8" seam allowance. For the ultimate clean look use 1" grosgrain tape to bind the edge. However, that would be largely a waste of time and weight, since you'd never see it, and the inside corners are hardly wear areas. Unless you have a special machine, a felled seam will be really annoying to do, since with a relatively small zipper opening, it will be hard to keep the rest of the fabric flat and out of the way. Don't go too overboard...a reasonably made frame bag is not likely to die due to seam failure. More likely the frame will fall out of favor for some reason, or there will be some incident with an exploding bottle of chain lube or peanut butter.
Do plan out ahead of time where to locate the velcro so it doesn't interfere with cables, bosses, etc.
Have fun!
|
|
|
|
|
Logged
|
|
|
|
|
Topic Name: Home made bike bag
|
Reply #4 on: January 12, 2010, 10:35:05 AM
|
boddunn
Location: Kirby Muxloe, England
Posts: 86
|
|
« Reply #4 on: January 12, 2010, 10:35:05 AM » |
|
Err... Fun? It's not my idea of of fun  I think I'm aiming for the sense of achievement when it's finished. How long ago did you make the bag? What kind of mileage have you done with it? I've spend more than I can afford on the fabric so I'd like it to last for a long time plus I'd like to keep my frame for foreseeable future (although I said that for the 3 previous frames!) |
|
|
|
|
Logged
|
|
|
|
|
Topic Name: Home made bike bag
|
Reply #5 on: January 12, 2010, 10:42:04 AM
|
Eric
Posts: 237
|
|
« Reply #5 on: January 12, 2010, 10:42:04 AM » |
|
if you are just using plain velcro avoid the temptation to sew the heck out of it in the same spot - you can over perforate it and it will rip out in the long run.
|
|
|
|
|
Logged
|
|
|
|
|
Topic Name: Home made bike bag
|
Reply #6 on: January 12, 2010, 11:05:46 AM
|
daveB
Location: Montpelier, VT
Posts: 78
|
|
« Reply #6 on: January 12, 2010, 11:05:46 AM » |
|
I made it in the early summer '09. Its been out and about perhaps 10 days worth of riding. I remove and clean when not relevant to my ride schedule. I expect it to last as long as anything commercially made. Ultralight stuff doesn't last forever anyway. Obvious trauma, excessive sun exposure, and consistent abrasion are the best ways to kill something. The Dyneema should be plenty adequate.
Ditto on Eric's comment. Also applies to any light nylon fabric. In general you want the fabric stronger than the stitching, so that if something breaks, its the thread. That you can field repair, whereas if the fabric fails at a seam due to excessive perforation, you're sunk.
|
|
|
|
|
Logged
|
|
|
|
|
Topic Name: Home made bike bag
|
Reply #7 on: January 12, 2010, 01:53:44 PM
|
sherpaxc
Location: Austin, TX
Posts: 577
|
|
« Reply #7 on: January 12, 2010, 01:53:44 PM » |
|
Wow, I was just about to start the exact same thread today. Awesome. My question is...How many pieces are actually sewn together? I see 2 main panels, but is there a strip of fabric for the TT, DT, and ST that bring them together?
|
|
|
|
|
Logged
|
|
|
|
|
Topic Name: Home made bike bag
|
Reply #8 on: January 12, 2010, 02:06:35 PM
|
daveB
Location: Montpelier, VT
Posts: 78
|
|
« Reply #8 on: January 12, 2010, 02:06:35 PM » |
|
Yep. Mine is 1.5" plus 3/8" seam allowance = 2.25". Proper width depends on your tubing diameter.
|
|
|
|
|
Logged
|
|
|
|
|
Topic Name: Home made bike bag
|
Reply #9 on: January 13, 2010, 03:38:36 AM
|
boddunn
Location: Kirby Muxloe, England
Posts: 86
|
|
« Reply #9 on: January 13, 2010, 03:38:36 AM » |
|
Good advice on the stitching guys, I'll definitely bear that in mind. Sounds like your bag's holding up fine Dave and you're right about Ultralight kit not lasting as long, I still sometimes think of over building kit to make it last for ages when there's not so much need compared to the advantages of less weight. Can I ask another question Dave? Your bag looks like a nice fit for the frame, did you make it slightly undersized so it's a little stretched in the frame or do you think it would be better to have it fit exactly? Sherpaxc, It'll be great to share our experiences or is that mistakes? I'm gonna try and start this weekend as long as I can find the bits I've got stashed and share some pics of my trials and tribulations. |
|
|
|
|
Logged
|
|
|
|
|
Topic Name: Home made bike bag
|
Reply #10 on: January 13, 2010, 05:04:49 AM
|
daveB
Location: Montpelier, VT
Posts: 78
|
|
« Reply #10 on: January 13, 2010, 05:04:49 AM » |
|
Yes, it is 1/4" undersized relative to the smallest (middle) part of the triangle. Velcro tensions it just right. One other detail that isn't obvious from the photo above is that the zipper tape doesn't terminate in the DT seam. Zipper tape butts to 1.5" grosgrain tape. ~3" piece of grosgrain terminates in seam; it can deal with an angled bend in a way that zipper can't. Also used urethane impregnated "waterproof" zipper sewn in backwards with the urethane layer facing out. Zipper foot for sewing machine always helps make it look nice.
|
|
|
|
|
Logged
|
|
|
|
|
Topic Name: Home made bike bag
|
Reply #11 on: January 13, 2010, 05:38:42 AM
|
boddunn
Location: Kirby Muxloe, England
Posts: 86
|
|
« Reply #11 on: January 13, 2010, 05:38:42 AM » |
|
Cool, thanks again Dave, your tension looks just right so fingers crossed my sewing is accurate enough to copy it.
I think I might terminate the zip within the side panel like Carousel seem to do, I'm pretty sure I won't have a problem getting stuff in and out. Having said that it does look tidy disappearing in to the seams...
|
|
|
|
|
Logged
|
|
|
|
|
Topic Name: Home made bike bag
|
Reply #12 on: January 13, 2010, 10:14:26 AM
|
sean salach
Location: palmer, ak
Posts: 253
|
|
« Reply #12 on: January 13, 2010, 10:14:26 AM » |
|
Don't mean to hijack the thread, but I've got a home made frame bag question as well. I like the look of frame bag attachments where the same fabric as the bag is used, with velcro sewn on, that run along the tube, like this: http://bp3.blogger.com/_8ndAAq40TD8/R-dUFfvB7uI/AAAAAAAAAi8/FwxQ7rXF0Cw/s1600-h/Soma08_meduim.JPG (link from Eric's site). I've seen it done by pretty much all the frame bag makers out there. They all seem to make it a seperate, sewn in rectangle of fabric. Anyone know the reason they don't do something like this, where the panels with velcro attached would actually be a part of the larger side and edge panels?: 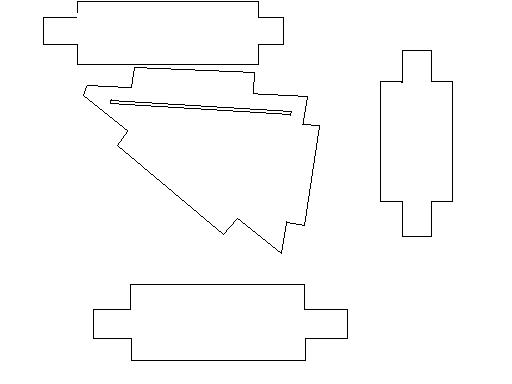 The drawing is obviously really simplified, and I would intend to make the corners where the 'flap' meets the main panels rounded. It's probably a really obvious and simple reason that is completely escaping me. It just seems like that would be an easier way of doing it. |
|
|
|
|
Logged
|
|
|
|
|
Topic Name: Home made bike bag
|
Reply #13 on: January 13, 2010, 10:26:52 AM
|
daveB
Location: Montpelier, VT
Posts: 78
|
|
« Reply #13 on: January 13, 2010, 10:26:52 AM » |
|
Sean-
That would work, but only if you sewed so that the seam and rough edges went to the outside, and then used binding tape to protect all those edges from unraveling. That would be more work, and wouldn't look as good, since binding corners, both inside corners and outside corners, is a very futzy thing to look nice. Also, it would end up looking like some upholstered furniture, which are sewn with matching piping. Seams and binding on the outside would collect loads of dirt too.
|
|
|
|
|
Logged
|
|
|
|
|
Topic Name: Home made bike bag
|
Reply #14 on: January 13, 2010, 10:41:27 AM
|
sean salach
Location: palmer, ak
Posts: 253
|
|
« Reply #14 on: January 13, 2010, 10:41:27 AM » |
|
My plan was to sew it inside out then flip it before sewing the velcro through both layers of the flap. I seriously doubt I have the skill to sew binding tape on corners. Guess I'll just go with the way everyone else is doing it. Thanks!
|
|
|
|
|
Logged
|
|
|
|
|
Topic Name: Home made bike bag
|
Reply #15 on: January 13, 2010, 10:58:14 AM
|
jeremy11
Location: Grand Junction, CO
Posts: 263
|
|
« Reply #15 on: January 13, 2010, 10:58:14 AM » |
|
Frame Pack #1, made June 09  Two zips with a velcro divider, and (mostly) top stitched seams. Don't try top stitching the seams. You'll only be able to get them earlier on anyway. Just sew the velcro into the seam, and then sew a zig zag down the inside edge of the seam to keep the fabric from unraveling. Fabric width along the TT, DT, and ST was about 3" with seam allowance, it came out pretty narrow and lower volume than I hoped for. The fit and finish wasn't quite right, and by sewing all the seams from the inside (no top stitching) it would get much better. Fit around the front derailleur was rough, as well as over the cable stop thingy for the front derailleur. Frame Pack #2, made Oct 2009 V1 worked fine, but I had more fabric and more ideas, so had to do it. 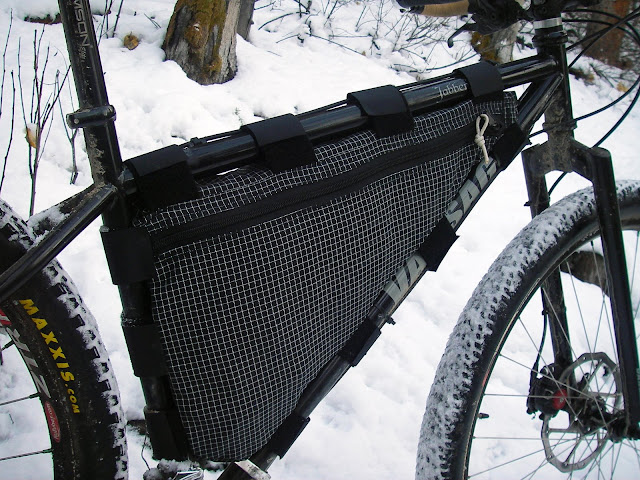 I cut the fabric along the TT/DT/ST to 3.5" including seam allowance, which gave much better volume without becoming unwieldy on trails. Only 1 zipper for better use of volume. The bag stops above the front derailleur so it is easier to put on and doesn't interfere with fd functioning. The only issue with it is the zip can be hard to close due to the tension or slackness of it, not sure yet what the fix might be. Have fun, and post up the full report! My new Fisticuff monstercross-ish bike will hopefully get a frame pack soon too. I'm hoping to attempt a big seat bag soon.... |
|
|
|
|
Logged
|
|
|
|
|
Topic Name: Home made bike bag
|
Reply #16 on: January 13, 2010, 11:02:20 AM
|
sherpaxc
Location: Austin, TX
Posts: 577
|
|
« Reply #16 on: January 13, 2010, 11:02:20 AM » |
|
I just don't understand how to install a zipper.  |
|
|
|
|
Logged
|
|
|
|
|
Topic Name: Home made bike bag
|
Reply #17 on: January 13, 2010, 11:08:17 AM
|
jeremy11
Location: Grand Junction, CO
Posts: 263
|
|
« Reply #17 on: January 13, 2010, 11:08:17 AM » |
|
|
|
|
|
|
Logged
|
|
|
|
|
Topic Name: Home made bike bag
|
Reply #18 on: January 17, 2010, 05:57:44 AM
|
boddunn
Location: Kirby Muxloe, England
Posts: 86
|
|
« Reply #18 on: January 17, 2010, 05:57:44 AM » |
|
Just found this info on zips too http://www.questoutfitters.com/zipper_tips.htm helped me when I did mine today; I've sewn the middle section to the side panel and installed the zip so just the other side to sew now; few mistakes and a bit of swearing but no where near as hard as I imagined. Pics and description to follow once I've finished it. |
|
|
|
|
Logged
|
|
|
|
|
Topic Name: Home made bike bag
|
Reply #19 on: January 18, 2010, 01:33:08 PM
|
slacey24
Posts: 7
|
|
« Reply #19 on: January 18, 2010, 01:33:08 PM » |
|
Hey, a friend turned me on to your site and after seeing some of the bags decided to try out my stitching skills. I cannibalized a worn out duffel bag for the fabric and zippers for this first test. I made the bag with two compartments separated by a zippered divider in case a larger compartment is needed. Hope it will make it out on the CTR 2010. Sorry I couldn't upload the pictures here but you can see them at http://450club.ning.com/profiles/blogs/homemade-frame-pack. |
|
|
|
|
Logged
|
|
|
|
|
|


